Thursday, September 28, 2017

Slow and Hot, Then Just Slow


It was an inauspicious start to the annual family reunion campout trip. I was barely two hours from the house, not quite 10% of the way into the 1300 mile trip, when things came to a halt.

I was coming up on a fairly new bridge that flies up and over some railroad tracks, replacing what used to be a squeezing cork-screwed dip that carried the road under those tracks, but only if you were less than 13’ high.

I saw the brake lights flaring less than a mile ahead up there on that bridge, eased up on the gas, and checked Google Maps on my phone which is piggy-backed on my laptop (The primarly on-the-road GPS) but saw nothing but green road ahead. By the time I drifted to a stop, there being no escape routes between here and there off that new K-barrier lined stretch of pavement, a little dash of red had appeared on the far side of the bridge and continued to creep back towards me as I watched.

According to the CB chatter there had been a high-speed chase ending in a wreck earlier in the morning and the State Troopers had just shut the road down for an accident investigation.

I wanted to key the mike and shout that there are very few true accidents and this certainly wouldn’t qualify as one of them!! Our continued insistence on calling these things accidents is not only very poor use of the English language, it also has the effect of letting us off the hook for these highly preventable incidents.  Even a wreck caused by a blown tire can often be traced back to careless inattention, and careless inattention is not an accident. But there is hope! I’ve noticed that the TV traffic person in the nearest large city now calls them wrecks and not accidents.

Anyway, once the initial creeping, as vehicles tighten up the gaps between themselves, stopped I turned off the lights, put The Van into park, and waited. I would have shut the engine down but this was mid-August, the cruelest month here in Texas, and The Van's ambient air temp gauge was already showing 100 degrees and since it was only a little past mid-morning that wasn’t going to get any better any time soon.


I sat there in the same spot up on top of that bridge for an hour and a half, and it took another half hour to creep down the other side and squeeze past the spot where emergency vehicles were still clustered. By now I was a good 100 miles behind where I should have been and the delay set the tone for the rest of the day, making the normally interesting trip up through the towns of east Texas a painful slog instead.

The next day I was back on schedule, having made up the lost time by driving deeper into the night before stopping; but that didn’t last. . .

On day two I was eating up miles on the 
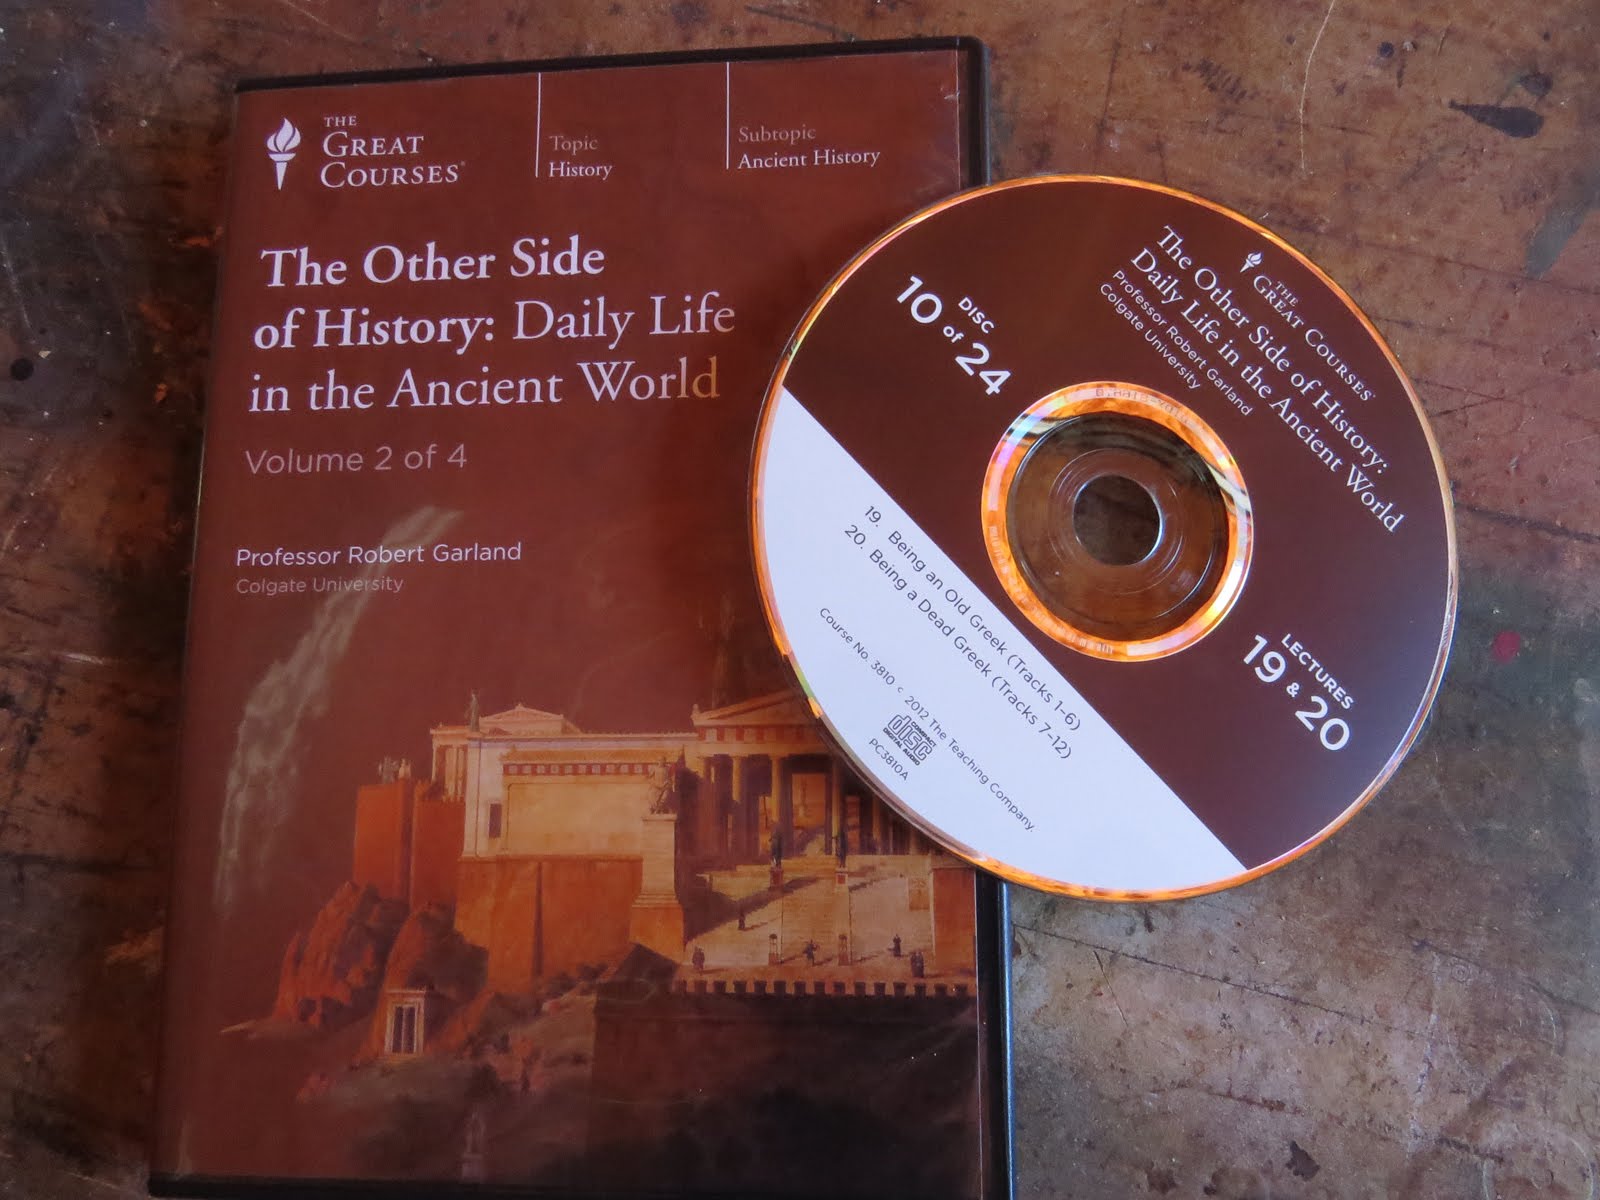
interstate, listening to one of my lecture series on CD, The Other Side Of History, a course on what it was like to be an ordinary person at various points in history rather than a king or general or someone like that.  I had just finished the lecture on Being a Dead Greek and the professor previewed the next lecture, Being Persian, by saying that we would learn some of the philosophical and cultural differences between Persians and ancient Greeks that are still relevant in today's east/west issues.

‘Oh good’ I thought as I ejected one disk and inserted the next.  ‘Learning something about why east and west have so much trouble getting along. How topical!’


Except that the radio only loaded the next disk partway then stopped. At this point it wouldn’t do anything. It was stuck on some in-between FM station. I couldn't eject the disk, I couldn’t change the station, I couldn’t switch it to AM, I couldn’t even turn the volume down! I punched buttons until my finger was sore but it just sat there hissing at me with the CD partially swallowed.

Once in a while as I dipped in and out of the mysterious radio-waves while following the white lines of the highway I got the ghostly hint of voices, but mostly I was listening to static and couldn’t do a damn thing about it. After an hour of this crap, even though it was early for a fuel stop, I located a Walmart with a Murphy’s gas station up ahead, pulled off the highway, and eased up alongside a fuel-pump relieved for the chance to get away from that incessant hissing.

Only when I turned the key off the radio kept hissing. I opened the door and the radio still kept hissing. I filled the tank, washed the windshield, wrote the miles, gallons and cost in my little notebook, and the radio was still hissing. Crap! This isn’t good!

Now my plan was to pull over out of the way into the parking lot and see what I could do because listening to that damn static for hours on end was not an option!

On the Sprinter, when you turn the key to the start position it uses relays to drop power to everything other than the starter, then returns power as soon as you let go of the key. At this point two things happened.  The CD  was promptly swallowed, the one with the lecture I was so looking forward to, the radio finally went dark, and quiet!, then it sat there staring blankly at me while ignoring all button-punching. Then, when I finally gave up on the radio, resigned to continuing on my journey lectureless, I turned The Van’s lights on as I prepared to pull out and get back on the road, and the dead-light indicator lit up on the dash.

Oh great! Now the damn radio has eaten my CD and won’t give it back, and last time the dead-light indicator lit up it took me forever to find the friggin dead light. (It was the license-plate lamp but there are actually two bulbs in there and only one was dead so every time I bent down and looked up there it was lit. . .)

I went ahead and pulled over into the parking lot and, unable to resist the temptation, wasted yet more time trying to get the damn radio to give me the CD back so I could at least play it through the laptop. Eventually I gave that up and went looking for the dead light, which was really easy to find this time since it was the left headlight. I keep spare bulbs in the foot-well compartment under the passenger seat so it didn’t take long to get the headlight working again.

But I had just used my last spare headlight bulb so, pretending I'm actualy a responsible person, I locked up The Van and trudged all the way across the parking lot into Walmart to buy a couple more spares because you never know. (Headlights tend to die in pairs and I couldn’t remember if this was the second of the pair or the first. If it was the first then the second would probably die soon and me without a spare!)


By the time I located the auto department in the unfamiliar store, found the right bulb, paid for it, and made the dangerous trek back out to The Van, (Oooh! Look at all this open space at the far end of the parking lot. I can drive any-which way I want, never mind the old guy on foot out there trying not to get run over by idiots like me!) I had a couple half formulated plans for trying to retrieve my CD from the radio, but by now, for the second day in a row, I’d already lost a bunch of time screwing around so that would have to wait for later. Right now I need to get back on the road, lectures or not, before I get anymore behind schedule.

Follow up:

Don’t ask me why, but The Van’s radio has two separate 15 amp fuses. Pulling one, checking it, putting it back, and pulling the second to do the same didn’t do me any good, but after pulling both at the same time, letting the radio sit for 10 seconds or so and plugging both fuses back in apparently resets the clearly computer driven radio and the damn thing started working normally as if nothing at all had happened. It’s still working today. I keep feeding it CD’s and it keeps dong its thing and then giving them back.

By the way, I think that bit about understanding the east-west differences was over-sold. Apparently ancient Greeks could not grasp the concept of living under the Persian autocratic form of government and Persians were horrified at the loose morals of the Greeks.  (Remember, this is all pre-Islam, which makes it pre-Christianity too.)

Follow up to the Follow up:

Just as I was getting back home from yet another trip to Michigan, the third in three months and second in three weeks!, one planned, two unplanned, the radio pulled the same stunt all over again. The Van is sitting out there in the driveway as I write this, waiting on me to go do the double-fuse-pull reset trick again. I'm a little hesitant to rush out and do it though because I have this nagging fear that as soon as I get The Van all cleaned up and prepped I'll get yet another call from Michigan. . . 


Monday, September 25, 2017

A Change to the Shower Routine


A while back I wrote a post on how I take showers, or otherwise clean myself, when camping.

Well since then there has been a slight change in that I found a replacement for my chamois.


These microfiber towels have the same water-absorption properties as my chamois and, if anything, they wring out even drier. In fact they wring out so readily that the trick to using them for drying is to let the towel suck up the water without applying any pressure to it as that just tends to squeeze the water right back out.

Considering that I can buy this 18 pack from a nationally available DYI store for about half the cost of a single small chamois, (It works out to about 50 cents per towel!!) is it any wonder that I retired my faithful bit of clammy-when-wet cow-hide?


So now when I head off to the campground shower, instead of the chamois I have one of the these microfiber towels tucked into my pail. If anything it's smaller than the chamois so there's even less tendency to drag the excess corners across those nasty shower walls, or even nastier shower floor when I'm drying myself.

And I keep another one on the rack for those times when I do a sink-shower there in The Van (Which, since I tend to do a lot of boondocking, is frequent and even when showers are available, its often a lot less hassle to just use the sink, especially if the showers are less than inviting! Ahh the joys of a nearly shaved head!!) or for hitting the pits, cracks and dangley bits at the sink just before hitting the sheets.

The towels come packaged evenly divided between white and yellow so I try to stick to white for drying and yellow for washing


because I've also ditched my traditional dish cloths and towels in favor of the microfibers as well.

Living small is all about simplification and using the same product for multiple tasks is one way to get there.


And since they are small, about 18 x 18, and virtually weightless I feel free to carry a handful of spares in a corner of an upper cabinet. Try doing that with a full sized bath-towel!!


And they're not just for showers and inside The Van either. They also come in handy for cleaning the solar panel, washing and drying vehicles, and the microfiber texture is perfect for applying rubbing compound, waxes, and other protectants, as well as softly buffing them out to that like-new shine.

Oh, and if you have been spending good money on tack rags for the shop, (Used for getting the last of the sanding dust off wood projects before applying a finish.) stop! These things do just as good a job for a fraction of the cost. In fact if you compare the expensive tack rag with one of these towels you'll not see any significant difference, in looks or performance.

On the down-side, the tiny loops you can see two photos ago do have a tendency to grab onto small shreds of leaves, twigs, bug-bits, and some of the more persistent food particles. And I mean grab on so tightly that running them through the wash doesn't always clear the debris, but at 50 cents apiece I can afford to retire those to shop-rags used for cleaning up paint or varnish spills and wiping down oily bits, you know, whenever I make one of my misguided ventures into mechanical things. (To cover my ass just in case The Wife is listening, I always wash those towels in a bucket and never the washing machine!!)


Thursday, September 21, 2017

Mid-Hike Gourmet


There's going to be some skeptics on this one because on paper what follows seems far too basic to reach the heights of culinary delight. But perspectives change between a nice comfortable stool pulled up to the breakfast-bar in the kitchen and sitting on a rock halfway up a mountain in the shade of a Cottonwood tree after hours of hiking.


Inside The Van's pantry, which I converted from the space where my now banished microwave used to live, is, among other things, a plastic bin full of Harmony House gourmet soup and chili packs. Now normally I'm ambivalent about soups, but as I pointed out just a moment ago, 'normal' is skewed mid-way through a day-long hike.


The morning of an all-day hike I'll reach into the bin of Harmony House packs and grab one at random. (If I don't select at random I start cherry-picking and eventually end up left with a bin of perceived if-I have-to's that can dampen the morning's enthusiasm, even though they're all good if given a chance.)


Then I turn around and pull my nearly bullet-proof food-jar Thermos down from the cupboard over the sink. In my case it's the 16 oz version as the 24 oz is way too big for one person and a half-filled thermos is not very efficient at being - well - a thermos.


Besides the 16 oz version comes with an integrated folding spoon which nests into the inner cap and it's a very handy thing to have.

If I have any complaint at all it would be that they don't offer 'handed' spoons. This spoon is designed for right-handed people but when used by a left-hander; me; it tends to try to fold as I'm scraping the last of the goodness out of the thermos.


In order to get hot stuff out of it hours after it was put in it's imperative to preheat the thermos first. I get my water boiling, fill the thermos, screw the inner cap on and set a timer for 10 minutes.

When the timer goes off I start the water boiling again, which only takes a moment since it's already hot, dump the current contents of the thermos into my other kettle to be used as wash water later (No sense in wasting it!), dump the the soup pack into the thermos, fill it to just below the top (To make sure there is enough room to get the lid on!) with freshly boiling water, and screw the inner lid on, (Snug but not too tight or it will be a real bear to get loose later when the temperature inside the thermos has changed!) followed by the outer lid/cup.

Some die-hard hikers, the same ones that tear the covers off paperbacks to reduce their weight in the pack, might be tempted to leave the outer lid/cup behind, after all that 'cup' is pretty damn small and of limited use (I'll point out one use for it in a moment.) but the thermal weak point of a thermos is where the double-walls join into a single walled lip where the lids screw on. The heavy walled outer lid helps retard some of the heat loss from this area.


And there you have it. A little something hot that's going to taste divine hours from now when my legs are aching, my lungs are burning, and I still have miles to go to get back to the trailhead.

But I do have to be careful!  If I give into temptation early, like anything less than five hours after I fill the thermos, the contents will be only slightly under the boiling point and I could easily sear my taste-buds off if I'm not cautious. This is where that tiny cup comes in handy, by spilling some of the contents of the thermos into it and letting it sit a moment, the heat level will come down from life-threatening to merely painful in a reasonable amount of time. (Even with the lid off it still takes forever for the thermos contents to cool down, especially when you're hungry!)

Now the Harmony House web site claims one pack plus a couple cups of water serves 4! They don't say 4 what, but it certainly isn't 4 hikers and believe me, I'm not about to share my thermos with anyone else!!

No seriously, believe me, otherwise you might get hurt!


Monday, September 18, 2017

Why Me? Yet Another Example of My Mechanical Dysfunction


If there's one thing I know (And yes, I've heard the whispered comments about me knowing one thing and one thing only!) it's that stuff breaks.

Which is why I take all the stuff out once a month and check it over. Air pressure in something like 34 tires we have around here is checked and adjusted, the on-demand water heater is flushed with vinegar, (We have really hard water yet don't like water-softeners.) the front gate is lubed and adjusted, (After a few years of opening and closing the damn thing by hand we got tired of that and installed an opener on it.) the air-conditioner/heater filters and coils are cleaned, the air-compressor is drained and oil checked, and the various engines around here are run.


Including the fire-pump.  (OK, shooting a 75' stream of water is not normally an efficient way to fight fires, but with the winds today, if I tried to photograph the more usual, and effective, wide spray the camera was going to get a good soaking and I wasn't too keen on putting out it's fire!)

Only this month the fire pump refused to run. . .

I turned the key and nothing. And I mean nothing at all except a faint jingle from the tag hanging off the key.

The battery dead, according to my meter it was flat dead, as in not even a wiggle in the needle. (Which isn't actually true since the meter is digital but you get the gist of it.)

OK, not a huge deal. Batteries die, which is why I buy the $20 U1's from Walmart, although they usually give some sort of warning before turning into a $12 hunk of plastic-encased lead. ($12 is the current core-charge for the U1) But I don't need the battery to start the pump. Unlike The Wife who couldn't pull-start even the smallest engine if her life depended on it, I, with my manly bearing, wide shoulders, and superior upper-body strength, can. (Crap, even I didn't believe that one!)


Except that after 20 or more yanks on the pull-starter, (I sort of started blacked out there and lost count.) a near coronary, and a very noodley left arm that clearly needs more working out, the damn thing hadn't made the least little effort to run. It hadn't even come up with a decent burp!

While I, with deference to my mechanical ineptitude, am willing to let such behavior slide when it comes to some of the engines-of-convenience around here (Witness the Quad which has had a dead engine for years now waiting for the fairy-godmother mechanic to show up, repair the damage I've inflicted trying to fix it myself, and breath life back into it!) some things are too important for that sort of behavior. Such as the generator, and especially the fire pump.

The nearest town is 5 miles and a county-line away with a population of 200 (On a school day, maybe!) and has a volunteer fire department that consists of 2 Bubbas and a Leroy in a pickup truck with a couple fire extinguishers and an assortment of shovels and axes in the back.

So, with reluctance, pretending I know at least a little about those tricky and vindictive little monsters we call engines, I went to work.

I know it's getting gas because I could smell it coming out the Forest Service certified flame-arrester exhaust.

No, I wasn't huffing. I know that gas fumes are a gateway drug to full-blown hard-drug addiction because the self-serving DEA told me so, (De-criminalize marijuana! Hell no!! Pot accounts for 40 percent of what we do. Legalize it and how will we justify our bloated bureaucracy and the budget that goes with it?) It just so happens that somewhere between the 15th and 25th pull I sort of collapsed on top of the engine and my nose ended up next to that little screen that's supposed to stop stray sparks from making a bad situation worse.

And it must be getting air because that's what's blowing the gas-fumes out the exhaust.

From somewhere in the dim past, probably something I'd overheard once while hanging around like a third wheel, a broken third-wheel, in my brother-the-mechanic's shop, I knew the next thing to check for is spark. For that I'm supposed to have one of those fancy spark-testers with an easy-to-view window for observing the spark safely. Yeah right (He drawls sarcastically) You really think I'm going to have one of those laying around here??


Nope - around here we do it old school!!

Well, OK, somehow I doubt my grandfather would have bothered with shutting off the fuel petcock, draining the carb-bowl and yanking the starter cord several times to ensure an explosive mix wouldn't be blown out the plug-hole right across the exposed sparkplug creating one of those Wile E Coyote plan-gone-wrong moments, but I did.

After taking a water-break, and a short nap, to recover from that last bout of cord-yanking, I attempted to see if I was getting any spark, but the bright day combined with trying to hold the plug in place and keep my eye on the tiny gap while yanking on the starter cord, all conspired against me.

After another short nap I had the brilliant inspiration to get out the jumper-cables and The Wife's side-by-side.

Now that all I had to do to spin the engine was turn the key, it took mere seconds to determine that, as I expected, there was no spark. (Remember that "as I expected" part because that's going to come back and bite me on the ass!!)


So now


I started the inevitable process of taking the damn pump apart until I could get down to the ignition coil where said spark was supposed to be coming from.

Because of my general ineptitude, each sub-assembly was carefully laid out in order on the bench as it was removed, along with all its associated hardware.

Because the loss of spark and the suddenly flat battery happened simultaneously, and being more comfortable with electrics than mechanics, I had this working theory that something had gone wrong with the wiring that a) drained the battery and b) was affecting the ignition circuit.


But I was willing to be flexible so you can imagine my delight when I ran across one of those cheap in-line fuse-holders tucked away behind the switch!!

But that delight lasted all of the 3 seconds it took me to open the holder and take a gander at the un-broken link inside the fuse. . .

Just in case this was one of those fuses that looks good but isn't (Hey! I've seen it happen!!) I slapped the meter on it.

Crap! Good fuse. . . No easy fix this time.


OK, admitting to the polyanic wistfulness of my original theory, time for a new one that doesn't involve a dead ignition coil, there at the green arrow, because a) I don't have a proper ignition coil tester (You didn't honestly think I would did you?) to know with 100% certainty that I had tracked down the culprit, b) I really don't want to have to pull the flywheel to get at the coil to remove the damn thing, and c) according to on-line parts stores that coil is around $100 bucks!!

So my new theory involves the shorting wire, that little black wire at the red arrow, that's used to stop the coil from doing it's thing (Otherwise it might be kind-a hard to stop the engine once it was running. Ahhh those were the good-ol' days when the engine actually ran. . .dammit greg! Focus!!)

So when I got this far in the disassembly process, I pried the little black wire off the terminal on the ignition coil,


kludged up a support for the key-switch, (so I could turn it with one hand while holding the sparkplug with the other, all without getting something caught up in the now exposed starter bendix.)


and added a couple jumper wires after I figured out that the key-switch needs to be grounded to do it's thing,


then checked for spark.

Fantastic!! I have spark! Who's the Man?!!

That little black wire must be shorted out somewhere.

Just to double check my brilliant troubleshooting I plugged the black wire back onto the ignition coil and tried again, knowing that now I wouldn't have spark anymore.

Oh Crap! I still have spark!!!

After another break for water and a short nap, I spent the next half hour tracing, inspecting and fiddling with wires looking for an intermittent short or break or anything, something!! But no luck. No matter what I did, I still had spark.

I started to suspect that because I was expecting no spark that first time I checked, I didn't see any spark. Friggin' expectations!!

The only sensible conclusion now was that my magical touch (Yeah, I've got one, at least according to The Wife. But then again she's easily impressed. . .) cleared up the problem and I was just going to have to live with the uneasy knowledge that it, whatever it was, could come back again at any time, but that's just the curse of living with a magical touch.

As long as I was at it, just to prove how good a mechanic I am, I went ahead and installed a new sparkplug then got some wild hair about putting fresh gas in the tank, even though the crude but nearly bullet-proof carb on this 9 horse Vanguard can suck the 1.5 gallon tank dry in just three of the monthly 30 minute test-runs so it's always somewhat fresh anyway.

I fished the only un-crushed plastic water bottle I could find out of the recycling trailer, removed the tank-line from the fuel shutoff valve and left the tank to drain into the bottle.


The results were, well, stunning!!! (Not to mention humiliating.)

But come to think of it, back when I was first attempting to pull-start the engine and inadvertently huffed the fumes emanating from the Forest Service certified flame-arrester exhaust, they did smell a little strange. Not as gassy as I would have expected, but I attributed that to the stabilizer I add to the fuel cans.

Which was probably right, just not right in the way I was thinking. Some of those chemicals in the stabilizer might be more, or at least just as, dense as water and had separated out from the gas right along with the water and thats probably what I had smelled.

I suppose if I had only been man enough I could have yanked the pull-starter long enough to pump the water right out of the tank and get down to the good gas, but that would have been one hell of a lot of pulling!!


The stunning part of seeing water in the bottle wasn't that there was water in the gas, not even that there was a lot of water in the gas, that happens sometimes. But not to the fire pump!!  For 12 years this pump has sat out in the weather there beside the main barn, next to the dedicated 250 gallon mobile water tank, ready for action, and this has never happened before!

Which is why I next suspected that the watered gas came that way right from the gas-station, so I marched down to the tractor barn, where we keep all the fuel, picked up the can I had last filled the fire pump with, shook it up well, and dumped a sample into a rinsed and dried glass container.(According to the label it used to have olives in it, though I don't know why that is of any importance whatsoever.)

I gave the contents plenty of time to settle but they were as clean and innocent as a freshly bathed baby. Nothing but gasoline. Not even a hint of other contaminants.

Welllll Crap! This is going to call for a change in strategy here. Even though that pump has sat out in the weather for years, through deluges of a foot of rain in half a day, and this past month is naturally one of our dryer months with less than 2" of rain (The pump started normally last month so the water wasn't there then.) I can't risk a repeat of this, not with something as critical as this fire pump may be one day. So now I'm going to have to find a place for it inside the already crowed barn along with the workshop, storage, laundry room, computer area, generator, ladders, etc.

Oh yeah, but first I had to put the damn pump back together. Not just back together but back together properly, which in my experience is not a foregone conclusion!


And after draining all the offending fluid out of the tank that I could, I needed to swab up the leftovers until the tank was dry because this crap has already cost me a whole bunch of time I could have been doing something more productive. (Mmmm, a nap sound real good about now!)


Somehow I manged to get things right and, with a fresh load of water-free gas, the pump started up, (But not until after I scared the crap out of myself by cranking on it for 10 seconds before remembering to pull the choke!!!)


for it's monthly 30 minute run at 125 lbs of pressure.

Finally! That's done. Now where was I??


Thursday, September 14, 2017

The Cat Couch Cover Gets a Roof


Corrugated PVC panels are about a third the cost of the polycarbonate panels, are reasonably durable as long as you don't try to throw someone through them (In which case they will shatter and leave a big hole in your roof!!) but they are still a pain in the ass to cut!


When cutting a single sheet I like to use tin-snips because they cut clean, (Never squeeze them all the way closed or you will get a little crack right at the tips that will go shooting off in some random direction!) but I had 4 panels to cut to the same length for the roof of the cat-couch-cover and for that I resort to my battery-powered circular saw and cut the stacked panels in one pass, even though that produces PVC dust which must be carefully swept up and thrown in the trash as it is not bio-degradable.

In order to keep chipping to a minimum I install a plywood blade backwards in the saw and solidly support the stacked panels on a scrap of plywood with more scraps clamped over the top to keep everything in place during the cut.

The base of my circular saw extends one inch beyond the blade and here I've clamped a level (Unlike scraps of wood, I know the level is straight.) one inch to the side of where I want the cut and will guide the saw against the level.


I adjust the blade so it extends below the guide-plate far enough to just kiss the scrap wood below the panels


Then make the cut. The edges of PVC panels will chip easily during cutting if the saw is not kept tight to the guide. I managed to make this cut with one small chip on one of the 4 panels. I think that might be a personal best!


Before attaching the roof panels, which extend beyond the arches a little bit for added weather protection, I needed to fit the side panels that will be put in place during cold weather.

To do this I temporarily screwed a panel to the side of the arch then marked where to cut.


It's  little hard to see my marks here, (On the panel to the right.) but back at the bench all I had to do was connect the dots with my tin-snips and refit the panel to make sure I got it right. Happy with the fit I used that panel to mark the one for the other side and cut it too.


I've got a bag of these gasketed fasteners (Upper left) left over from building the well-house and even though they are designed for drilling into metal they work just fine on wood and these are the fastners that will hold the side pieces in place. But they are too long for fastening the roof panels to the arches so I removed the gaskets from a bunch of the fasteners so I could slip them onto shorter screws for the roof.


The trick with these fasteners, whether using the original or the shorter screws, is to carefully snug them down just until the gasket starts to bulge. This is the sweet-spot where the fastener is holding well and the gasket is sealing things up.


From here it was just a matter of screwing the panels down, then, in the case of the side panels, clearly marking them as left and right so I can get them back on this winter using the same screw-holes. For now I'll take them off and store them away.


All that was left now was to drop the cover over the cat's couch and call it done! The hinged panel across the front will be left open during warm weather and when accessing the sleeping boxes inside, yet can easily be closed up for protection from those wet, chilly winds we sometimes get during the winter.


So that's it. How to go from redneck shabby-chic (OK, trashy)


to less trashy. . .

OK, my tools are all warmed up, what other trouble can I get up to around here???


Monday, September 11, 2017

Giving the Modestly Interesting Project Some Structure


OK, last time I managed to make up the two arches for the Cat Couch Cover. The next step is to put some structure under those arches to hold them up.

I suppose that might seem like a simplification, a lot like saying "We have the roof-rafters, now we just need to put a house under them." but really, the structure to go under the arches was fairly straightforward. Not as straightforward as simple vertical studs would have been but - well - here, see for yourself!


The first step was to rip my 2X6 lumber down to narrower widths and this is so simple I didn't even bother with a photo. Just set up the rip-fence, a feather-board or two and feed the lumber. Easy-Peasy.

Except!: See the little green doohickey there right behind the saw-blade? That's my reeving-knife and has no purpose when crosscutting as in the photo, but is a very important safety device when ripping lumber. The knife is exactly the same width as the cut the blade makes and keeps the freshly cut lumber from pinching in on the back of the blade which will then lift the lumber, violently, and pitch it right back in the face of the operator. Reeving-knives come in various forms but whichever form you find on the saw you are using, make sure you use it!

 I could have stared with 2X4's, and even left them 2X4, but 1) 2X4's are milled from the leftovers, in other words, the worst wood from the tree, so 2X6 or larger is generally better wood; straighter, cleaner and less twisty, and 2) As you will see in a moment, I have a thing about blindly using dimensional lumber as is.

Even if I had bought twice as much 2X4 lumber instead of the 2X6's I did, I still would have ripped them down to get sticks that are proportional to the project. I have this thing about using full-dimension lumber where it isn't necessary. It drives me nuts to see 'professional' builders using full 2X4 lumber to build closets, vanities, cabinets, and couches, especially when they are going into tiny-houses!! The resulting structure is cheap and clunky-looking, way over-engineered, weighs more than it needs to, and sucks up valuable space that could be better used for storage.

Anyway - point is, ripping dimensional lumber down to proportional sizes is far more professional looking and dead-easy to do.

For this project most of the sticks are finished out to 1 1/2" X 2 3/4". Even this is chunkier than strictly necessary but since this project will live outdoors, exposed to the merciless weather, and even more merciless cat-claws, the extra heft will help it last just that much longer.

The next step, since all my verticals are wonky and have no right-angles, was to trim one end of the slightly over-length sticks to the proper angles. (Finally, text that is relevant to the photo above!) I took the angles directly off my SketchUp drawing and transferred them to the sticks with my cross-cut guide on the tablesaw.


I also have one half-lap joint under each of the two arches where two of the sticks cross each other.

After setting the proper angle on the cross-cut guide, cranking the blade to the proper height, (One half the thickness of the stick) and marking the position and limits of the half-lap on the relevant sticks, I carefully nibble away the excess wood by making multiple passes over the blade shifting the wood about a blade's width for each pass.

Note that my first cut is not quite to the limit that I marked. Once I get the rest of the wood nibbled away I'll try to fit the notch over the other stick. It won't go because I cut short of the mark, but I will make additional passes across the blade, each one taking off a very thin slice, and test fitting again until I have a snug fit that goes together with a gentle wack from the heel of my hand. (Any tighter and there's no room for glue and I risk spitting the wood. Any looser and the long-term integrity of the joint won't be as good as it might be.)


Once both sticks are notched


they slip together with a good wack, forming a nice tight, strong joint,


especially once glue and a single screw are added.

This all might sound complicated but the reality is that in the time it took you to read about it (That's assuming you're still reading. . .) you could have had the joint half completed.


With all the angles cut where the vertical(ish) sticks meet the base I clamped everything down in it's proper position then laid the arch across the overly-long ends of the sticks so I could mark and cut them to their final lengths.


After that is was just a matter of gluing and screwing everything into place then repeating the whole operation for the second arch.

In reality, since both the right and left arch assemblies are identical, to save tool setup time, I cut everything in pairs. i.e. When cutting the bottom angle on the front vertical support for the left-hand arch assembly I grabbed the front vertical support for the right-hand arch assembly and cut it too.


After that it was a simple process to connect the two arches together with a total of three straight cross-members, make up the simple hinged access panel with more straight sticks,


then add the hardware to hing and latch the access panel.

By now the temps were bouncing up against the 100 mark and the sun was pretty-much straight overhead which meant The Wife's side-by-side, which had been kicked out of the shop to give me some assembly space, was sunburned to the point where I could smell the vinyl seat cooking, so I tossed the assembly out beside the driveway and rolled the side-by-side back into the shade of the shop.

Tomorrow I'll finish the project up by putting the PVC roof-panels on.