Alternative title:
If I Make One More Plug I'm Going To Go Nuts!!!
(OK, for you sticklers out there, I mean more nuts than I already am.)
Anyway, last time, frames, this time plugs
(OK, for you sticklers out there, I mean more nuts than I already am.)
Anyway, last time, frames, this time plugs

A prominent feature of Greene and Greene is Ebony plugs locking the joints together, such as you see in the chair to the left.
Sometimes lots of Ebony plugs!!
Now I could go to the specialty hardwood distributor and buy a chunk of Ebony and cut plugs from it, but the distributor is a long ways away and Ebony is really expensive, so I went old-school instead.

This awful looking mess is a quart jar that I dumped some steel wool into then filled 3/4 full with common 5% white vinegar.
After leaving this concoction to cook for at least a week, and two is better, you end up with a solution of iron oxide. (And lots of other gunky looking things!) What you don't want to do with this jar is screw the lid on tight while it's cooking because the reaction produces gas and you really don't want this jar to burst and spread that solution all over.
The iron oxide solution reacts with tannin. Tannin is found is just about anything, especially in certain hardwoods. When the iron oxide and tannin get together the chemical reaction results in a rich, deep black that is embedded right in the cells of the wood fibers as opposed to stains which soak in around the wood fibers or paint which sits on top of the fibers.

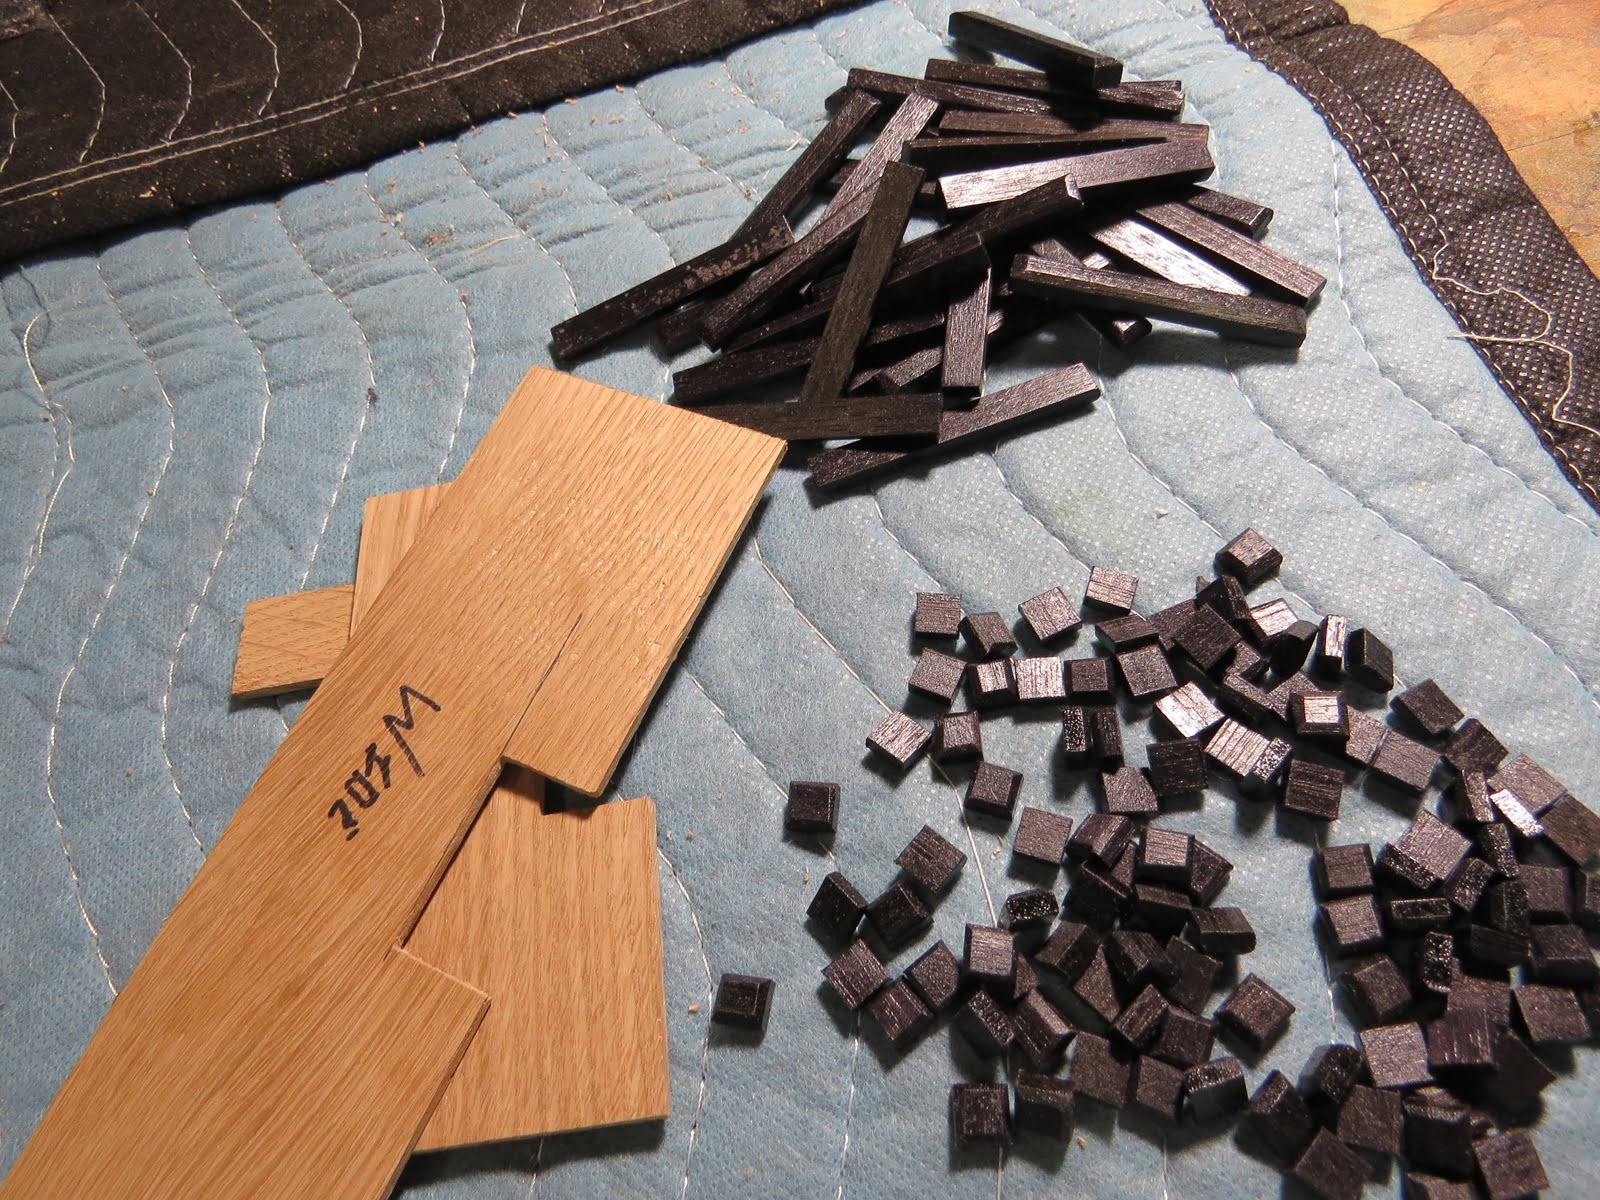
But before I can ebonize them, I need plugs, about 200 square plugs as well as nearly 60 rectangular plugs.
Above is a small sampling of my first try at making the square plugs, but I wasn't happy with them because - well, frankly they sucked - so they got tossed into the burn pile (Yeah, that sucked too.) and I started over again.

I was much happier with the look of my second attempt at the square plugs; but not so much with the making of them. . .
Cutting some scrap Walnut into 5/16 inch wide, 3/16 inch thick strips. Admittedly, 1/8th inch thick strips would have been better but that was just too thin for my fat fingers to handle the plugs during the upcoming beveling step.) I then cross-cut those strips into 5/16 squares; lots of 5/16 squares! which was simple, but putting the 45 degree bevel on the four top corners pf each little square was a pain. Literally, since for each of the 4 bevels on all 280 square and rectangular plugs (I made a few extras to avoid having to come back and do this again.) I had to pinch the plug between forefinger and thumb, touch a corner to the running belt sander which I had clamped upside down to my bench, then turn the plug 90 degrees, re-pinch, sand and repeat, over and over and over - and over - again. That's over 1000 bevels I had to sand in and by the time I was done my thumb was bloody from being sanded on as well. Out of desperation I tried a bandaid, oops, I mean an adhesive bandage, but as you would expect, I just couldn't get a grip on the plugs with that thing on there so I continued to sacrifice skin-cells and blood for the cause. (Hey! I never said I was smart!!)

But eventually I had all the plugs milled up and ready for the ebonizing process.
The jar on the right is my well-cooked iron-oxide solution, the jar in the middle is the same solution poured through a filter to remove the gunk and remaining bits of steel wool. The jar on the left is really strong tea.
No, I wasn't using it as a refreshment! Even though I was using Walnut for the plugs, which is naturally high in tannin, I pre-soaked the plugs in the tannin rich tea, the lidded plastic container on the left, which helps ensure a good strong reaction during the next step. Which, after a quick shake to dislodge excess tea, was to dip the plugs in the iron-oxide solution, the smaller container between the two paper towels. I then carefully laid each plug out to let them 'cook'.
This is a chemical reaction and the pieces don't instantly turn black. It takes a good fifteen minutes for the full effect. You can see that the plugs on the right-hand paper towel, while not their final deep black yet, are darker than the ones on the left. That's because they were dipped first and the reaction is a bit further along.
Once the wood is dry the reaction stops and if it isn't dark enough, a second round of dipping will deepen the effect. I didn't need a second dip since, as you can see in the photo below, one time was enough to get a good, deep black that's penetrated so far into the wood that it would take some serious sanding to get it back off.
Oh by the way, remember when I told you pretty much everything has tannin in it to some degree or another? That includes skin and many fabrics so I suggest if you try this that you wear nytrile gloves and old clothes!!!
My plugs didn't need a second dip, but I did have to get a protective finish on them. Since the dang things are so small I did this by dipping a few at a time right in the Polycrylic then rolling them around en-mass in a paper towel to suck most the finish back off again.

Of course these plugs aren't doing me a damn bit of good until they're mounted.
To help with getting the square plugs placed properly I made a couple jigs for the two different widths of joint they would be mounted on.

The actual mounting was done with superglue. I put the jig in place, pick up a plug and orient it with the long grain of the plug parallel with the long grain of the frame part it will be glued to, (Carefully done by craftsmen of the past so they both move together in reaction to humidity levels rather than fight each other.) put a tiny, very tiny, little dot of superglue (CA) in the center of the plug, carefully position the plug with the jig, then hold it there for 30 seconds before going onto the next plug.
Since I had not particular interest in counting 1 one-thousand, 2 one-thousand, 3 one-etc, etc, a few hundred times I used the stopwatch on my phone to keep track.

Most of the rectangular plugs flank the pulls (I'll get to drilling and mounting the pulls in another post.) and for those I used a simple half-inch spacer to get them set the right distance away from the knob but then just eye-balled where each one went from that point.

In the mortise and tenon joint of a century ago, before glues were so effective, the plugs served to lock the tenon into the mortise by being driven right through all the parts of the joint. This dictated the placement of my square plugs. Most of the rectangular plugs are pure decoration, (OK, I know it sounds more sophisticated if I say they are 'design elements', but that's pretty much the same thing isn't it?) but a few of both kinds of plugs actually cover fasteners. If I ever need to get at these fasteners in the future a sharp rap to the side of a plug will snap the super-glue bond.
Remember, if I manage to damage a plug I have spares. and after all the work and blood it took to make them I will Not be tossing those spares into the burn pile!!
Next time, panels, 36 of them and each one custom fit.
Your ideas and work are way beyond my pay grade ... great work !!
ReplyDeleteTell me more about this pay stuff!!!! Hell, I'm lucky to get fresh water and few crackers around here. . . (FYI, the key is in the editing. I keep my failures just outside camera-shot.)
Delete