Monday, December 28, 2020

The Walter Buck Ranch - Otherwise Known as South Llano River State Park

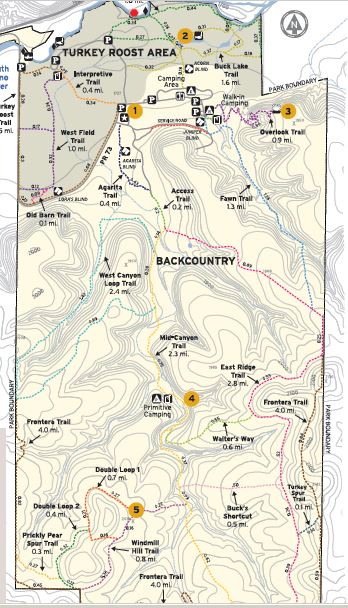
Trail map for South Llano River State Park

It was the Sunday of Thanksgiving Day weekend and I was on the road. (El Día de Acción de Gracias in Spanish, which somehow sounds not only more mellifluous but also more like the original intent of the day, emphasizing, as it does, the action of giving thanks - not that any of that's relevant to this post - - - so moving on - - -)

I didn't plan on being on the road on this day. I don't usually get out on the road for any holiday, let alone one that means travel with a capital T to the collective American psyche as much as this one does. It just happened.

When I made my reservation for a campsite at South Llano (pronounced Yah-no) River State Park several months ago I was just looking for a block of available nights, and the calendar on the reservation site doesn't differentiate holidays from normal days, so when I found a campsite with a consecutive string of 5 free nights I closed the deal.

It wasn't until a week before the trip, when the reservation system finally allowed me to pre-register and print my windshield-pass, that I realized the conflict between my reservation and the close of the holiday weekend.

Oh well. I wasn't about to give up my hard-won slot so I guess I was just going to have to pull up my big-boy pants and tough it out.


Originally, on my way to the park I had planned on stopping in Fredericksburg to get some architectural reference photos for a painting style I wanted to try.

Fredericksburg is always busy, but tucked in behind the National Museum of the Pacific War, (Admiral Nimitz was born here in this town) just across Austin Street and snugged into a bight of Town Creek, is the Convention and Visitor's Bureau.

 (Sadly, as I write this on Dec 20 I just heard a report that the long-standing, month-long Fredericksburg Christmas Festival is attracting large crowds this year that are defying COVID guidelines and threatening to turn it into a protracted superspreader event. Many are claiming freedom as an excuse for this behavior. The citizens of Wuhan where COVID was first detected, people that come from a culture that focuses on the well-being of the community rather than the me, me, me of the US culture, bit down hard on a strict and difficult 76 day lockdown and took it seriously. The result? It's been over 6 months since the last locally transmitted new case of COVID was detected in Wuhan and with basic precautions the city is opened up and functioning almost normally. Some businesses didn't survive and some jobs have not yet returned, but generally people are working, and, without getting sick and dying in the process, restaurants, bars, gyms, museums, stores, schools etc. are open and operating at near pre-COVID levels. In other words the economy took a hit but it is functioning and well on the way to a full recovery, while the US continues to set records for new infections and deaths nearly daily, and weekly first-time unemployment filings pile up at a record pace. Who's free now?  Frankly our grandparents and great-grandparents would be horrified at how stupidly selfish we've become. - - oops, a bit of a rant there - - But it's my rant and it stays, so deal with it!)

Now I don't really care about either the convention nor visitor bureau, but there's also a 120 slot, free visitor's parking lot back there, and since it's a whole block and a half off of Main Street, which makes it way too far for most of us to walk as we'd rather circle and circle, and circle, Main Street until we finally happen to come upon someone backing out of one of the coveted closer parking slots, I've never had any trouble finding a parking spot back there. (There's also an adjacent public restroom that may have come in handy in the past but right now I'm avoiding enclosed public spaces, including restrooms, like the plague - or to update that statement, like the COVID!)

The plan was to slip The Van in back there, mask up, grab the camera, and temporarily leave its protective bubble of sanctuary to anonymously wander the streets for a few minutes grabbing some photos, but I started getting jittery as I got closer to town and the the traffic thickened. Then when I got into the heart of the action a few blocks before the museum and saw the ebb-and-flow of Corona-oblivious people crowding the sidewalks and piling up nuts-to-butts at crosswalks like so much driftwood waiting for the dam to open and release them to bobble and drift on another block to the next pile-up, I went into full meltdown and drove right on past my turn at Lincoln Street while averting my eyes lest I inadvertently turn and join the deadly flotsam.

Instead I settled for a few one-handed, stop-light photos as the anxiety quietly whined in the back of my throat and spilled out through my nose (Why is that car getting up so close behind me? Haven't they heard about social distancing?!) until I finally cleared the last traffic light at the west end of town and was spit out into less popular, and less populated, country again.

An hour and a half later I pulled into the State Park where, even though I had pre-registered and had my pass taped to the windshield, I still had to walk into the little headquarters building (former residence of the Buck family) and check in with a live, potentially diseased, person. (Masked and behind Plexiglas, but still - ) Of course as I was collecting my paperwork to go in, someone else drove up and got in ahead of me, so I had to wait around outside until they were safely out of the way again, and to make sure any respiratory particles they left drifting around behind them also had time to leave, I hung out for a little longer. (OK, yes, I'm aware that I'm pretty obsessive about all this isolation stuff, and sometimes wonder if I'll ever be able to go back to "normal" in the future.) If it wasn't for this check-in my trip would have been completely contact free.

It (how much contact is involved) appears to depend on the park, and even the day, but when I went to Bastrop and Colorado Bend SP's during the summer I just drove right on in with my pre-printed pass. If there was any contact at all it was someone checking my windshield pass while I was out hiking. But when I went back to Colorado Bend in November there was now a little kiosk with adjacent generator plopped down in the middle of the entrance road and I had a masked, drive-thru type exchange with someone inside that "checked me in" on the computer and handed me yet another (potentially contaminated) pass to tape to my windshield. And here at South Llano, though I actually had to enter the headquarters building (shudder!) to check in, I was told my pre-register pass was all I needed to display.

Different parks, different superintendents, different rules.

These are my collective hikes from this latest trip

Anyway - Other than a short, shallow stretch of the South Llano River which you can tube from a put-in at the low-water crossing of the entrance road, down about a half mile to a takeout point, (Just a graveled spot on the bank, then you have to hand-carry your floating gear down a path back to the parking lot near the put-in) South Llano River State Park doesn't have what the general public might consider any distinctive geological features or attractions.


And, other than a handful of walk-in tent sites and 4 backpacking sites which aren't on the reservation system and don't appear to have been used in some time, the only camping is the 50 or so rather pricey ($20) water-electric sites which aren't my first choice. (But during winter camping it is nice to use some of that overpriced electricity to run a small cube-heater in the evenings - - -) 

But this 2600 acre former ranch has it's own quiet, understated beauty, a peaceful dignity that comes from being what it is, no more, no less - not to mention a lot of solitary hiking! (I covered a shade over 56 miles on foot during this latest 5-day stay and encountered three whole people - which, now that I re-read that statement, kind of implies that there were some partial people too, which there weren't. At least none that I saw!)

Being located down on the edge of the river-bottom the campground is well treed and doesn't have any real solar-friendly sites, but then that's how I'm going to get value out of my 200 usable Ah's of lithium-ion batteries, so no big deal. 

Walter Buck was 18 when his dad, also a Walter Buck, bought this ranch and moved the family from the Dallas area in the hopes that the drier climate would be good for Walter's  tubercular older brother. Unfortunately the brother died within a year but the Bucks stayed on, with Walter Jr. taking over the successful ranch when his Dad died.

Walter was quite the environmentalist and quickly reduced the 1000 head of sheep, goats and cattle by half and eventually he was down to 150 head of cattle as he focused on restoring the ranch's sustainability and natural ecosystem. He never married and in 1977, at age 85, donated the ranch to the Texas Department of Wildlife and Parks. It was opened as a State Park in 1990.

All of which is a long-winded way of saying this place is definitely worth a visit, or two, or, in my case five or six, so far.

The ranch is actually divided into two distinct habitats. The lower section (the north end) lies in the Llano River valley and these bottom lands support hardwoods, many of them pecan which allowed Walter to harvest some 60 thousand pounds of nuts per year. Then just behind the relatively lush bottom land rise the limestone ridges and canyons typical of the hill-country. It's much drier up here with a whole different set of plants, most of them pretty spiky.

I was still pulling hair-fine cactus spines out of my leg several days after getting back home. If that doesn't sound like your idea of fun stick to the established trails!


Speaking of trails, as a former ranch, the majority of the trails are old ranch-roads, or tracks depending on your definition of a road. This is one of them, along the eastern fence line, that is still almost road-like, with others maybe not so much. But still, none of them present any particular difficulties to even the novice hiker, other than maybe length, (A loop-hike to the far end of the ranch and back again will come in at about 11 miles)


But there are a couple trails, including this one which is new since I was last here in 2017,


that are more conventionally trail-like.

Of course, as soon as I discovered this new trail, which isn't on the maps yet, I had to try it. But part way up to the overlook


SNAKE!


Oh, wait. I just scared the crap out of myself over an innocent Honey Mesquite seed-pod!


Well that was a good start to my stay here! But it didn't stop me! So there's some South Llano hikes coming up in future posts.


Monday, December 21, 2020

MaxxFan: A Critical but Quick Repair


It's been slightly more than three years ago that I replaced The Van's air-conditioner with a MaxxFan 7500K Deluxe powered vent and I haven't regretted the decision once.

Oh there have been times, such as when I camped in triple-digit temperatures just this year where I wouldn't have refused to turn the AC on if it was still up there on the roof, (Of course there were no hookups in that campground so the powered vent was much more useful anyway) but life is one long series of compromises and I am still happy with my decision.
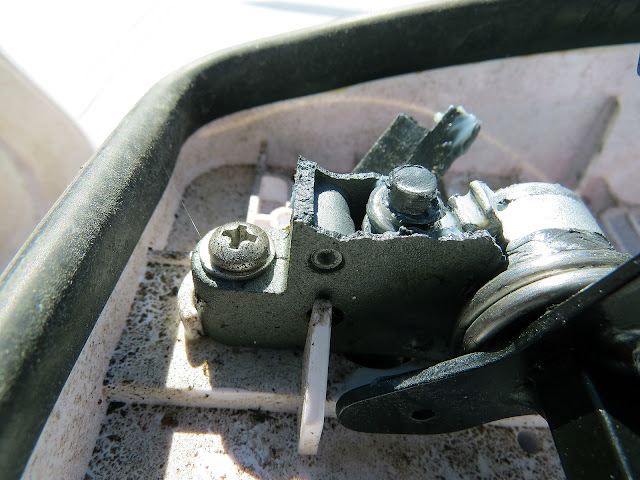
I'm pretty sure it's not supposed to look like that!

But one day recently, when closing the vent for The Van's monthly exercise run to town and back, there was some loud clacking that I'd never heard before, and the lift-motor wouldn't stop running until I grabbed the manual knob and held on tight. (There are no stops in the lift mechanism itself, instead the control board looks for high current, which indicates a motor-stall, before shutting off the power.)

Something had gone seriously wrong with the lift mechanism and no matter how many times I cycled it from open to closed and back again, it just refused to fix itself.

The one in the upper left is what it's supposed to look like. The other one is what mine looked like.

Some internet surfing turned up the fact that if these MaxxFans have a weak-point it's either the push-button control board or the lift actuator. As you can see in the photo above, in my case it was definitely the actuator which had suddenly blown itself into enough pieces to fill a puzzle-box. (The actuator is easier to replace than the control board so if something just had to break I got off lucky.)


The short-term fix was to remove the screen (easily done by hand) and the fan-blade assembly, (quickly removed by loosening the set-screw with a 3/32 Allen key)


then cut a scrap of wood to length and jam the lid open with it before putting the fan blade and screen back.

By the way, removing the screen and fan-blade assembly then reaching up past the four motor-supports is also how I go about cleaning the inside of the vent cover without having to climb up on the roof, which I try to avoid where possible.


During some internet wandering I found a PDF parts manual for my fan (which I have since downloaded and made a permanent part of The Van's folder which contains all the manuals and such to the many different parts that make up it's systems.)

With the part number from the manual in hand (There are two different lift actuators, one with a long shaft for the manual version and another with a short shaft for the electric-lift version) some more surfing turned up etrailer.com which had my part - for a price!

Apparently a year ago they were selling this part, which largely consists of pot-metal which explains why mine blew up into so many pieces, for about $15. I paid closer to $40 for it. (November 2020)


Since the MaxxFan cost about 10 times that much I ordered the part anyway and while I waited did some more searching which turned up one single, somewhat helpful but not exactly meticulously detailed youtube video on replacing this part.

Fortunately, though this was never mentioned anywhere, and I couldn't find them on-line, the part also came with printed, detailed replacement instructions.


Subtracting the time I spent cleaning everything since I had it opened up anyway, the replacement took about 15 minutes, 20 if I include tucking tools and cleaning supplies into my pockets and carrying the ladder out to The Van.

With the lid open, or in my case, propped up, from up on the roof the two screws that hold the rain-shield to the vent cover are easily accessible.

With the screws removed the rain-shield drops down out of the way and allowed me to reach in and slip the lift-arms out of the slots in the vent cover, careful to keep track of the plastic bushings that are involved. This then let me lift the cover up and out of the way.

Removing two more screws over on the left let me remove the lift arm assembly. And a final two screws over on right let me remove the remains of the old actuator.

That's 6 screws but each pair is a different size so I made sure to keep track of which went where.

Oh, and all these screws seat into plastic so tighten snugly but don't over torque!


With the new actuator in place I transferred the lift-arm assist-spring from the old actuator to the new.

That spring is held on with a bolt so bring some small pliers up on the roof to hold the nut. (fortunately I anticipated this before climbing up there the first time) The only other tool you need for the entire replacement process is a Philips screwdriver.

The instructions detail a very simple procedure for pre-setting the actuator to ensure the proper range of motion once it's installed, but the splined shaft of the actuator still has to fit down into the motor's socket. That youtuber pointed out that it's handy to have helper down below to slowly turn the motor with the manual knob until these two parts slip together. Since I work alone I just left the screen and fan assembly off so I could reach down through the opening from the roof and turn the knob myself.

Yes, there's still some dirt there in the tiny little corners but I'm not OCD so good enough!

With the arms parallel to the roof as instructed and hex-end of the lift arm assembly inserted into the new actuator over on the left, I replaced the retainer over on the right


then reached back down inside and turned the knob to raise the lift-arms up to where I could spring the other ends back into the vent cover brackets.

Then reached in one more time to lower the vent-cover far enough to screw the rain-guard back on before very gingerly easing myself over the edge of the roof, back onto the ladder, and finally the safety of ground.

If I had been thinking (Oh damn! What a concept!) I would have brought the remote control up on the roof with me so I could make sure everything was working properly before I made the risky climb down, but fortunately all was well and I didn't have to go back up again.

But then again, the remote is line-of-sight-IR so wouldn't have worked from up on the roof anyway. Once again I get away with not thinking!!

The fix was quick and straight-forward, but as pricey as the MaxxFan was initially, as well as the replacement part is now, I would have hoped for a ductile stamped-steel actuator housing rather than the brittle pot-metal housing it comes with.

Oh well, it is what it is and it's not like my other vent, the Fantastic Fan, hasn't needed some repairs over the years as well.


Monday, December 14, 2020

Some Serious Potholes on the Old Gorman Road


 Aaahh yes. Breath deep - let your senses soak it in - rejoice in being alive - because it's another glorious morning and soon the sun will be taking some of the bite out of the air.


I have to vacate my campsite today, but before heading for the house I'm going to sneak in one more hike.

Nothing too ambitious since I've got a solid 4 hour drive ahead and would prefer to be there before the winter sunset. Just once around the Cedar Chopper Loop with a side excursion down to the river and back on the Old Gorman Road.


So what's a cedar chopper?

Well this whole area used to be the Heller Ranch, but raising livestock on this Central Texas ground is tough and the 3200 acre ranch only supported about 200 head of cattle, or about 16 acres per head. (By comparison, a well managed East Texas ranch can support about 1 head of cattle per acre of land.) But one thing the area does have in abundance is Cedar (technically Ash Juniper but same difference.)

Cedar was, and still is, used for fence-posts and furniture, but at the end of the 19th - beginning of the 20th centuries it was in even greater demand as the raw material for charcoal used for heating homes and powering the area's industrial revolution.


 Before all this cedar could be shipped out to the charcoal ovens (After 1912 that's what the Cedar Tap Railroad was for. Today there are only a few scattered remnants of the railroad left, and you have to know where to look to find them.) it had to be 'chopped' down by gangs of - you guessed it - cedar choppers.


For a decade or so during the boom-times the cedar choppers and their families formed a community of around 300 in this spot. It had mail delivery, a school, a commissary, and even a cemetery.

Over the years I've wandered around off-trail up here several times and the best I could ever do was find a small concrete slab that most likely once supported a communications tower of some sort and dates from some time after the cedar harvesting days. (That was before GPS and way-points and I've never been able to find it again since.)  True, the community was mostly a tent-city but you'd think there would be some remnants of at least the cemetery lurking around out here somewhere.

Maybe one day I'll find something - but not today.

In the meantime - -


I meandered on around the established loop-trail. And it's not all cedar out here. Once in a while the landscape is interrupted by a hardwood grove.


I'm pretty sure these are one of the many different oaks, but I'm not sure which one.


About halfway around the loop I hit the Old Gorman Road and head down it towards the river.


As you would expect from a former road, the hiking is pretty easy along here, but there are some pretty serious looking potholes you have to be careful not to fall into.


This whole area is riddled with caves, and the openings to them have to be somewhere, but come on! Does it have to be right there in the road waiting to swallow dogs, small children, and the occasional oblivious adult?!

The park service and a couple spelunking groups run tours around here, (Or at least will once again when we get past this Covid era.) but I myself never saw the attraction in jamming and squeezing and oozing myself down wet, black holes


and cracks


barely big enough to fit my boot, let alone my fat head, so I carefully steered clear.


Down near the lower end of the Old Gorman Road is something a little more my speed.

Not so much the building itself,


which is some sort of meeting hall though I have never seen it actually in use,


but rather my interest is in the back patio which edges right up to the bank of Gorman Creek a few hundred yards above where it eventually falls over the edge of the bluff and forms Gorman Falls prior to making it all the way to the Colorado River,


and makes a perfect spot for an early lunch.


Just a few feet from where I'm enjoying my tuna and crackers there's a steel bridge connecting the meeting hall to the service road.

It's a heavily built bridge that can support small vehicles, and that's good because this rather large Live Oak branch has fallen right in the middle of it, as Live Oak branches, especially those of the older trees, tend to do.


I wonder how long before this branch from the same tree comes down and crushes the roof of the meeting hall into kindling.

Oh well. I never have been, and likely never will be, invited inside, so what do I care - - - Now, if I hear cracking from above during lunch do I grab for my pack or just run like hell?


Thursday, December 10, 2020

A New Table for The Van


It was actually December 2019 when I did this and I'm just now getting around to posting about it.


When designing The Van, to be built by Sportsmobile of Austin because I was working 60 hour weeks at the time in the run-up to retirement, I specified a flip-up extension at the end of the counter.


This was a way of getting some additional counter space (Which I really don't need as I already have 5.5' of 22" deep counter.) as well as a handy little table for the swiveled passenger seat. Although handy might be stretching the point a little.

In reality this flip-up, while better than nothing, has its limitations.

As a counter extension - well - as I already pointed out, I really don't need more counter space.

As a table it's really too high to be entirely comfortable when sitting on the swiveled passenger seat, is fixed in place to the counter cabinets which make it too far away from the seat unless I sit right on the edge, is absolutely useless if I am sitting on the gaucho, is too high and far away to be an effective night-stand when the gaucho is in bed-mode, and has to be cleared off and stowed away in order for me to get in or out of the side door.


I really don't have an excuse for putting up with this for ten years before getting off my butt and doing something about it, but at least now I've finally rectified the situation.

After doing up some drawings in SketchUp and pondering the situation for a while I headed off to the hardware store (Ahh, those were the good ol' days! The pre-corona days when we could just wander in and browse a store without Darth Vardering behind a mask and carrying a 6' pool-noodle to defend our personal space against deadly pathogens.) and came home with about $55 worth of stray 3/4" black-iron pipe bits and pieces. (Those flanges alone are nearly $8 each!)

The rest, including the table itself, I scrounged up from the "scraps" around the shop.


The first thing I did was cut a slice off one of the two (expensive) flanges. This modified flange will be screwed to the floor right up against the end of the cabinet where the flip-up used to hang.


The location of this cut is the same distance from center (where the center of the pipe will end up, which is the standard point for measuring black-iron pipe and fittings.) as the face of the diverging leg of the T fitting you can see screwed onto the other end of the pipe there in the distance.

At this point it was important to get the cut face of the flange and the face of the diverging leg of the T perfectly parallel because the short nipple screwed into the T out there needed to fit through a nipple-sized hole I drilled in the end of the cabinet (You can see that hole in the second photo of this post)


where it would be captured on the other side by a cap, clamping the whole thing firmly to the cabinet itself.

By using an off-the-shelf 18" nipple between the flange on the floor and the T I ended up near where a shelf attaches to the end of the cabinet. In other words, one of the more structurally sound locations available. (Using off-the-shelf components saved me having to get a pipe custom cut and threaded. Something not all hardware stores are set up to do anymore.)

For even more distribution of any loads that might be incurred at the T-nipple-cap location I glued a hardwood block to the inside of the 1/2" thick cabinet wall before tightening the cap down to tightly clamp the vertical pipe in place.

No need to add cushioning to the cap (For some reason there were no caps available in raw black-iron so I had to use this galvanized cap instead, but since it's out of sight inside the cabinet it wasn't a deal-breaker.) because the curvature of the cast-iron pan that sits there on that shelf won't let pan and cap connect, keeping them from raising an unholy rattle as I go down the road.


Here you can see the installed vertical portion of the table-leg with the marine-grade carpet, which is really a custom fitted rug that snaps in place, notched to fit neatly over the floor-flange and around the pipe.

I could have gone to the trouble of sewing an edging around this notch, but in my experience dabbing the backside of the carpet with contact cement does just as good a job at keeping things from unraveling with a whole lot less effort.

Before installation of this vertical section I firmly tightened a 3" nipple into the top of the T and loosely threaded a 90 degree elbow on top of that. (Loosely so the elbow can swivel, which is key to making this table work.)

The 3" nipple was a compromise between getting the finished table just high enough to be usable when I'm sitting on the passenger seat yet not too high to use when I'm sitting on the gaucho which is 4" lower.


For the articulating arm that was key to making this table work I assembled more of my bits and pieces, using 12" nipples for the long arms, a close-couple nipple for the short vertical (This photo shows a slightly longer nipple in that location which I ended up using in the T that clamps the leg to the cabinet side instead.)

The 90 degree elbow on the lower right is the one that goes on top of the vertical pipe. The street-elbow on the upper right screws into the second flange which is attached to the bottom of the table-top.

While the vertical joints in this setup are designed to swivel, all the horizontal joints


must remain fixed and in alignment so the table doesn't tip over and spill my dinner, so after taking a pipe-wrench to them and carefully tightening things as far as I dared while still maintaining proper alignment, (Black iron pipe is malleable which means that you can actually gall and strip the threads if you tighten things too far - - Go ahead, ask me how I know what too far is!) I pulled out the 10KW welder (I know, serious overkill, but that's the only welder I have.) and tacked those joints to make sure they stay in place.

. . . OK, I admit, I picked out the best of my tack-welds to show in this photo,


but the inescapable truth is that I suck at welding, and this is one of the practice tacks I did on some extra-bits first that I didn't show you. (refer back to that sentence about tightening things too far to figure out how I ended up with otherwise useless extra-bits . . .)


While all this was going on I had another issue to deal with. The "stainless steel" hing used to hang the flip-up on the cabinet end has been getting more and more rusty every year and this is what was left behind when I removed it.

And don't worry about the flip-up bit of counter I just removed. (As if you were.) After removing the hardware from it I have now re-purposed that bit of solid-surface counter as a known flat-and-true surface to build my railroad models on. In fact I was gluing up parts of a model on it earlier today.


Vigorous cleaning only partially solved that problem, but that was a mute point since the surface melamine of the cabinet end has already been breached by the corrosion in a few places.


My fix for that was to drag out some of the quarter-sawn white oak scraps left over from when I built the cabinet doors and fashion a "design element" that matches the architecture of the cabinet doors and covers up the mess left behind by the corroding hinge as well as the holes left by the flip-up's support leg, and also serves as


bumpers for when the table-arm is being manipulated around as well as stowed away.

The table-top is made from a chunk of 3/4 oak-veneered plywood I had left over, edge-banded with an iron-on banding, also left over from another project.


To keep the table top in place when stowed away I fashioned some cleats out of maple, which matched the table better than the white oak and saved me from having to cut into a nice quarter-sawn white oak board that I can now use somewhere else - eventually.

All of the wood parts of this table are finished with 5 coats of ragged-on, water-based Minwax Polycrylic satin. After some snobbish resistance to anything other than oil-based clear finishes, I've been using this far less toxic and nearly VOC-less stuff for years now and find it very resilient and long-wearing, even in harsh and sometimes-less-than-dry conditions. I even sprayed a couple coats of this on the black-iron pipe assembly to postpone corrosion to somewhere into the future.

I used the loop side of some stick-on velcro to make pads to keep the stowed table from rattling when going down the road.


There are three joints in the articulating-arm assembly that are designed to swivel so that the arm and table-top - well, articulate. For two of these I squished a dab of high-pressure grease into the threads prior to final assembly to help keep things loose and swiveling.

The third joint is where the flange on the bottom of the table-top screws onto the street-elbow at the end of the articulating arm. No grease there because that joint is taken apart and exposed when the table-top is stowed.


So does the new table address the issues as I was hoping?

Yes!

Comfortable, sit-back-dining for the first time ever at both the passenger seat


and the gaucho.


And now I can look forward to the decadence of kicked-back evening lounging without having to rest my portable DVD player on my lap while balancing my drink beside me on the gaucho,


and, though I generally prefer to play my keyboard (Always with a headset on so don't go gettin' all angry-villagers on me!) while standing at the counter, now I also have the option of sitting to butcher play some tunes.

When stowed the table is as unobtrusive as the flip-up was.

When set up - - Pull the arm loose from the "broom clip" that keeps it in place while traveling, flip up the two retainer-toggles holding the table in place, set the table on top of the arm and spin to attach. (I was a little worried that getting the flange attached to the bottom of the table threaded onto the street elbow would be finicky, but it is surprisingly easy) - - the table easily moves to all sorts of locations, without having to remove the contents first, getting it out of the way and letting me move around inside The Van as well as get in-out the side door.

And all the bits of the new table weigh in at almost exactly what the flip-up weighed so in that respect it was a net-zero deal. (Corian is beloved by many but is actually heavy stuff to be putting into an RV.)

So again, I don't know why it took me so long to get around to this relatively easy project, but I finally got there.

So now what can I hack up next?