According to the numbers, one of my more popular posts was/is
Showering While Camping.
This post is along similar how-to lines but focused on how I manage my electrical power needs in The Van. Only time will tell if it will be equally popular.
If you were an outsider looking in, be they in massive motor coaches with umbilicals as large as the wrists of the old men driving them or tenters hopelessly tangled in their web of orange and yellow extension cords, next to ice and beer you might get the impression that electric power is the most critical camping necessity.
Years ago the National Park service tried to limit generator use in the no-hookups Rio Grande Village campground of Big Bend NP and it created a huge protest that got plenty of press in the travel magazines of the day. The proposed generator hours were the middle of the afternoon and one of the most common complaints wasn't, as you might expect,
'we're out enjoying the park in the middle of the afternoon and not around to start and attend to our generators', but rather
'we need our generators to brew the morning coffee'!! (Studies show that all addicts, heroin, nicotine, caffeine, food, alcohol and
even holy rollers, share the same type of brain activity and chemistry both when jonesing and in the bliss of getting their fix.)
The Park Service was simply trying to provide a more enjoyable experience for those visitors that came for (Gasp!!) a little peace and quiet in this remote National Park, but, as is often the case, the panicked, therefor loud, power junky minority rode roughshod over the quiet majority and generator hours actually ended up being extended rather than reduced. (And now, decades later, they're still 8AM to 8 PM !!!).

If you've ever been subjected to the Rio Grande Village campground's sudden cacophony of whining starters and roaring generators at 8 AM on the dot, (Though there's often one wise ass that jumps the gun and then the rest of the generator crowd quickly piles on like it's a rugby maul!) you'll understand why, even though in my opinion this would otherwise be the best of the three organized campgrounds in the park, I recommend the no-generators-allowed-at-any-time Cottonwood campground at the other end of the park, some 55 miles away.
While the generator crowd represent one end of the electrical power spectrum, at the other end you'll find the campfires-and-kerosene-lanterns crowd, with not even a single AA in their kit.
I'm probably closer to that end of the spectrum than the other, but I'm certainly far from being a rewilder looking to go back to the ways of my 6 times great grandparents! I do have my electrical
needs desires, (Face it, if it's not shelter, water or food it's not technically a need.) modest as they may be.
In fact my
needs (Dang it!) desires, are modest enough that during a multi-week trip this summer 100% of my 12V power needs were met by the 180 watt solar panel on the roof of The Van.
But this was a mostly mid-western summer trip with The Van's on-board solar exposed to decent sun most days. Power management isn't always as simple as checking the monitor a few times a day just to make sure everything is working properly. Sometimes my power management requires a more active role.
110 Volt (Shore Power) management
Before I go into more detail in regards to the 12 volt system, I want to get the 110 volt system out of the way first.
The way The Van is set up there's only one thing I
can
only do with 120 volt power and that's run the air-conditioner. Frankly something I would really like to be able to do without anyway!
Given half a chance I would rip that 100 pound AC unit off the roof and replace it with a 10 pound
Maxxfan Deluxe powered roof vent, but given the realities of inhabiting a steel box that thermodynamicly bears an uncanny resemblance to an oven, and having family in the Midwest (Visiting them means summer trips at low elevations with high temps and higher humidity.) that's not likely to happen.
Because I have no generator, (Check near the end of
this post for some thoughts on why.) my only option for running the AC is campsites, or driveways, with electrical hookups.
But when I am tethered to the power grid I'm certainly not above taking advantage of it for operating an electric tea kettle for water heating, charging camera and GPS batteries, and sometimes even switching the fridge over to 120 Volt operation if I want to conserve battery power.

I do most of my 110 volt system management from the breaker panel. I say most because the TrippLite inverter/charger is hardwired to the shore-power (Relying on an internal breaker for protection.) so that has to be managed separately which I'll get to in a moment.
When not tethered to shore-power all the breakers are turned off.
This does two things. It's one more safeguard against arcing in case I've forgotten to turn off the breaker in the campground electrical box when I plug or unplug the umbilical. And it ensures that I will actively manage the 110 volt power rather than just plug-and-forget.
And I've never been a big fan of plug-and-forget.
The crew I handed over one of the 10 million dollar data centers to when I retired practiced the plug-and-forget school of management once my nagging ass was gone and about 3 years later it exploded, (Literally, as in the arc-flash event, which briefly produced a plasma-cloud in excess of 20,000 degrees F, blew 2 truck-sized industrial roll-up doors right off the back of the building!) causing over 3 million dollars in damage and about 50 million dollars of lost or delayed revenue. Not a good risk-reward outcome! It's only luck that the event happened when no one was in the area to be injured or killed.
But, back to the subject at hand:

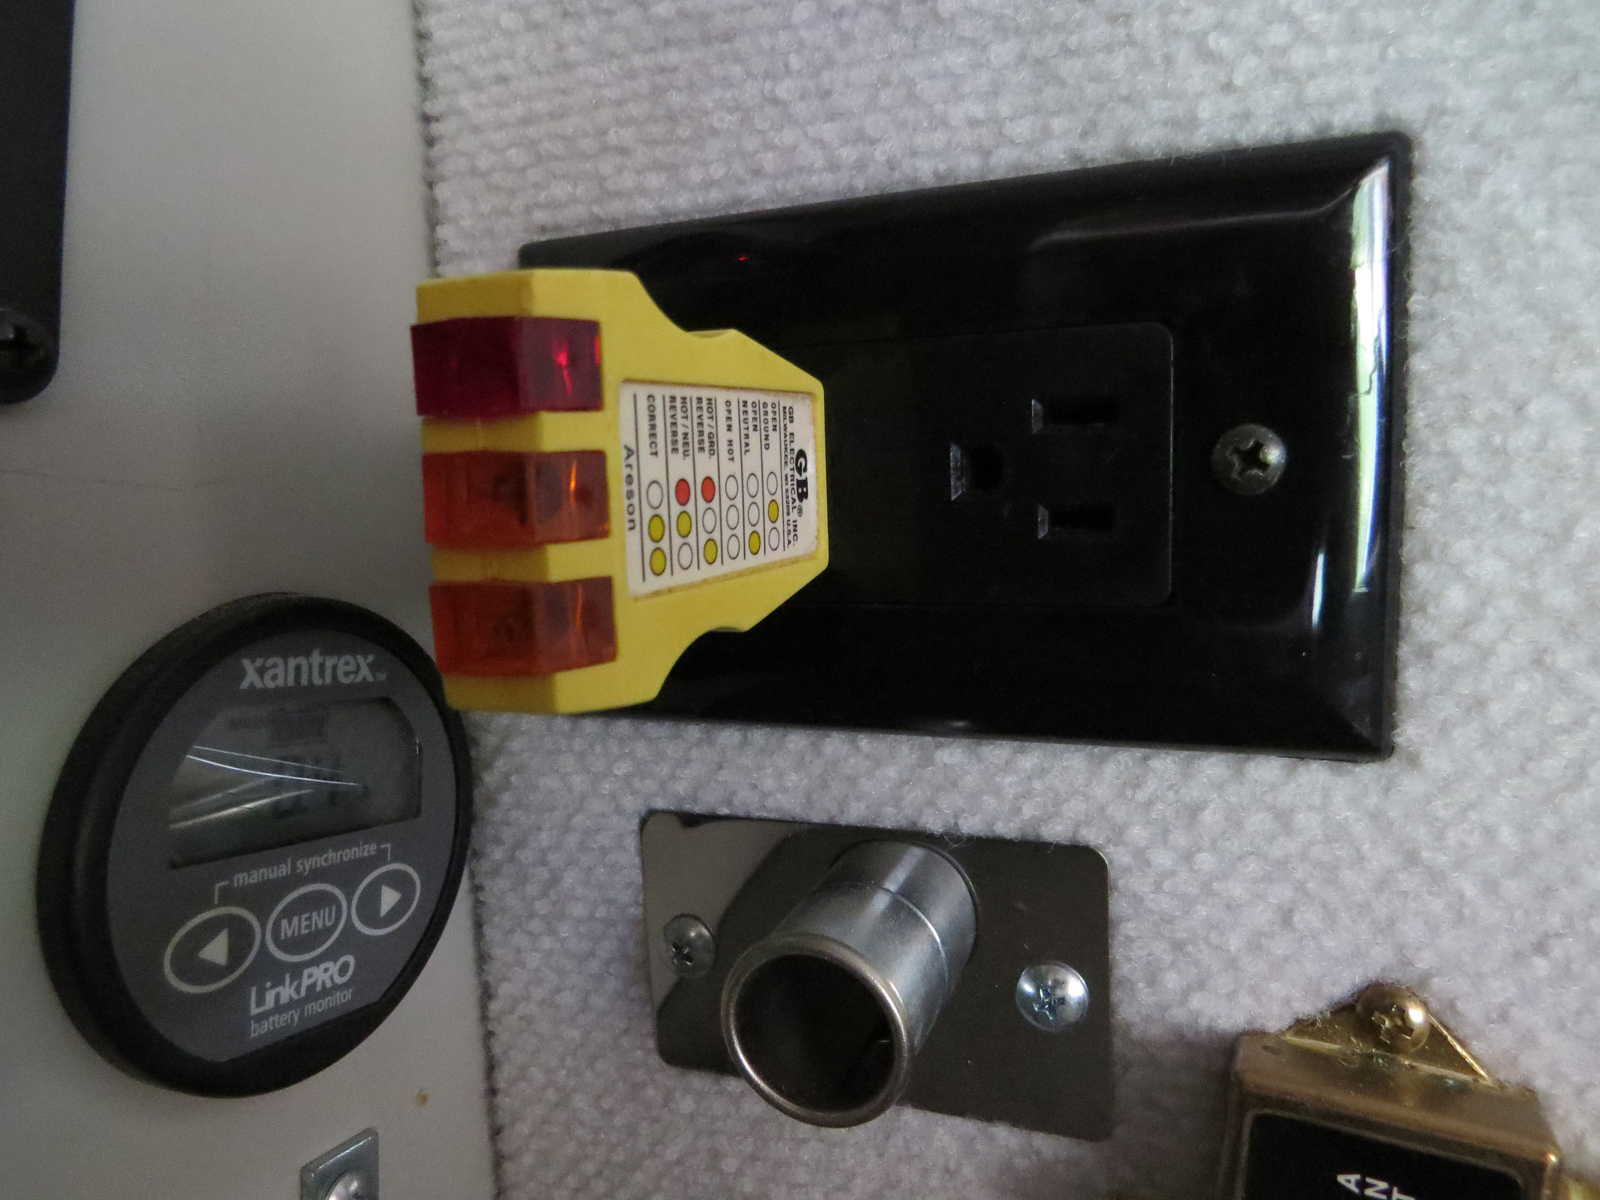
Once I've got the umbilical hooked up and the breaker in the post turned on, I step into The Van and turn the main breaker on. Then I'll briefly turn on the GFI breaker, just long enough to check the circuit tester plugged into one of the outlets wired to this breaker.
Unless I'm actually using one of the outlets, once I'm sure everything is wired up properly I turn this breaker right back off. (Nothing is ever
likely to happen with a properly installed and protected circuit, but I
guarantee nothing will ever happen when there's no power on that circuit!)
Since I've probably tethered myself to shore-power because I need the AC unit, I'll then turn on that breaker and use the AC's control panel to start the unit.
The other breaker is wired to a single outlet where the microwave used to be plugged into before I got rid of it and the fridge is still plugged into. The only time I turn this breaker on is when I want the fridge running off of 110 volts rather than 12 volts.
OK, some of you might have noticed that charging house batteries wasn't mentioned in my list of things-to-do when on shore-power. When the inverter portion of my really expensive 2000 watt Tripp-Lite inverter/charger failed awhile back, (out of warranty of course) it didn't affect the charger portion, so I can still use the charger when hooked up to shore-power, but I usually don't.

The internal control board of the TrippLite, that ribbed box tucked down there among the battery boxes and all those wires, continuously draws about 0.2 amps of battery power whether I'm using the TrippLite or not. So I leave it turned off so it draws nothing from the battery at all. And because it's hardwired to the shore-power circuit the only way to turn it on and off is by lifting the heavy gaucho cushion and blindly reaching down into the depths below, depths where both high voltage shore-power and, even scarier, high current DC power lurk, for a tiny little micro-switch tucked under a protective cover, so I have to
really need some extra battery charging before I bother.
(Here I have the heavy gaucho cushion removed completely for another project, but normally I don't have near as easy access as this. . .)
A big part of power management is taking care of your equipment, and to help with one part of that I have a set of carabiners, one small, one large, hooked together. They've actually been with me for 30 years and 4 different rigs now.

When the shore-power cord is rolled up and stored in the rear-door pocket, the set is clipped around the cord using the small carabiner.

And when the shore-power cord is plugged in, the set is clipped onto the steering wheel using the large carabiner
That way I'm not likely to try and drive off with the umbilical still hooked up and end up making a real mess of things, something I've managed to avoid so far but seen done more than once.
12 Volt Power Management
I'm not going to get too much into battery maintenance, solar systems and determining actual 12 volt power needs here, there's plenty of in depth information on those subjects readily available elsewhere, what I will do is talk about how I manage my 12 volt power needs.
Monitoring
I was going to start this section by saying that you can't manage a system without data about that system, but that's not quite true.
A surprising number of people seem to subscribe to the head-in-the-sand school of management. I know they're out there because I've seen them in action, both in the business world as well as RVing.
They
guess they can get two or three days out of their battery because they heard that's what a friend of a friend's neighbor can do. (And everybody knows we never exaggerate!) They
suppose, since this is the second day, that they can make it one more night. But the only time they
know anything for sure is when the lights go out and the TV stops working.
Me? I'm more of a data kind of guy. I've got a meter on our water well and record the readings once a month into a spreadsheet. I carefully track and record the National Weather Service compliant rain-gauge mounted on a post outside the barn. I add extra monitoring to my vehicles so I can see actual coolant and exhaust temperatures as well as turbo pressure and engine load. And I have monitoring on my Solar as well as Battery systems in The Van.
Now technically a battery's state of charge is determined by it's voltage (Using a hygrometer went out with the advent of 'sealed' batteries.) and if this were practical then monitoring would be pretty inexpensive, just plug in one of those cheap digital volt meters, memorize the voltage to state-of-charge chart, and you're done. But since the only way to get an accurate voltage reading off a battery is to let it rest, with no inputs or outputs, for anywhere from 30 minutes to an hour before taking the reading, that's just not very practical.
A more realistic, though admittedly more expensive, way is to use a monitor that continuously tracks amps going both in and out of the battery and gives you the number of cumulative amp-hours* that have been taken from the battery at any given time.
* 1 amp-hour = 1 amp for one hour. i.e. if my overhead light draws 2 amps and I leave it on for 2 hours that's 4 amp-hours.
If I have a 200 amp-hour battery and my monitor says I've used up 40 amp-hours then I know I have 60 amp-hours left that I can still use.
Nope. That's not bad math, it's real world. Anytime you deplete a deep-cycle battery more than 50% of it's rated capacity (About 12.18 volts for you voltage junkies.) you use up one of it's limited number of lives. There are probably some exotic batteries out there that don't follow this rule, but I'm not an exotic kind of guy, so in my world, that 200 amp-hour rated battery bank in The Van gives me 100 amp-hours to play with.

Since I'm not a fan of any sort of artificial light shining in my eyes in the dark of the night I've mounted my monitoring panels inside an overhead cabinet. Right at eye level, easy to access, but shut away when I'm not actually looking at them.

I tend to leave my Xantrex battery monitor set on the real-time amps readout so I can see at a glance what's happening right this moment. (Currently showing 0.4 amps of incoming current. If I was drawing that 0.4 amps
from the battery there would be a minus sign on the left.)

But a quick push of either of the buttons with arrows on them lets me cycle through other readings, such as voltage, estimated time left on the battery, estimated percentage of charge, and, as shown here, the all important amp-hours drawn out of the battery.
At the time I took this photo the battery was fully charged with all 100 amp-hours of usable capacity available to me.

With the inverter part of the Tripp-Lite fried, it's control panel, bottom left three photos ago, is even more useless now than it was with it's high-medium-low LED's, which are pretty much crap no matter who's monitoring panel they're on, but I certainly rely on the Blue Sky Solar Boost panel to keep me informed on how things are going up there on the roof.
Right now, which happens to be in the afternoon with the battery fully charged, it's telling me that I'm getting 0.9 amps from the solar panel. The battery is taking 0.4 of that for a trickle-charge, the monitors themselves are taking their usual 0.1 and the final 0.4 amps is being used by the small inverter I have plugged in to charge my GPS batteries.
So, two different monitoring panels showing me what's going on with different parts of my 12 volt system, both pretty straightforward and simple, but all the information I need for intelligent management.
Battery Charging
I've got three different ways to charge the house batteries and I'll take them each in turn.
Solar
In my case the vast majority of the battery charge comes from the solar system. Assuming depleted batteries ready to take on a bulk-charge and/or significant 12 volt power consumption, I can get nearly 10 amps out of my 180 watt solar system under ideal conditions, or 7 to 8 amps under real-world conditions.
But it's important to know that the closer a battery (Or battery bank) is to full charge, the less charge current it will accept. As my batteries get to the 80 to 90% charged state they will only accept somewhere between 4 and 2 amps of charge-current respectively, regardless of how bright the sun is shining on my solar panel. (and I'll come back to this near the end of the post when I'm talking about using 12 volt power)
I'll typically start getting a decent output (enough to run the fridge plus extra for battery charging) from the solar system around mid-morning and that lasts until late afternoon. (For practical reasons my panel sits horizontal and can not be angled for optimum reception.) Since I'll generally eat through only 20 to 35 amp-hours of battery capacity in the dark(ish) hours between late afternoon and mid morning, most of it for running the fridge, (Hot weather = more fridge run-time, cooler weather = less run-time.) it often doesn't take all day for the solar system to top up the batteries.
Even under less than ideal conditions, such as light cloud cover, I can still get 2 - 4 amps out of the solar system which might not get the batteries fully charged during the day but will give me a boost and usually let me make it through to sunnier times.
But a shaded panel, be it trees or heavy clouds, will be lucky to kick out one amp, so once in a while solar alone just isn't enough.
Shore-power charger
I've already explained why I rarely use this, in my case the Tripp-Lite inverter/charger, but it's there if I need it
and I'm hooked up to shore-power. But if I'm hooked up to shore power I'm more likely to just switch my fridge, the largest single 12 volt consumer I have by far, over to 110 volt operation and limp on by with whatever the solar panels can supply me with for everything else.
While on the subject of shore-power charger, as Americans we tend to think bigger is better, but that's not always as true as we'd like to believe, and RV house battery charging is definitely one of those areas.
My Tripp-Lite is rated for up to 40 amps of charge current, which means some pretty hefty, and expensive, components inside there, but the only time I could ever get close to that kind of current for a sustained period is if the batteries were well depleted and cool. (warm batteries = high resistance = less current ) More typically I'll see 25 - 30 amps or so of bulk-charge current for a while, but that soon drops as I get into the absorption phase of charging, then trickles off to near nothing during the float-charge phase. (If you want to know more about the different charging phases than the abbreviated explanation I have in this post, there's plenty of info out there on the web.)
On top of that, RV's are not golf carts that need to have a quick, hard charge slammed into them between rounds. If I'm going to be plugged into shore power at all it will be for no less than overnight, so I can get by with a modest, and much more cost effective, charge rate. Which is why, when I get around to removing that defective Tripp-Lite I will be replacing it with a much lighter, much less expensive, 10 amp smart charger
like this instead.
Suckling at the teat of the shore-power outlet for a single 12 hour overnight stop would give the modest 10 amp charger plenty of time to take me from even heavily depleted to decently charged. (But not fully charged! See the next section for why.) Since this level of battery depletion is a rare condition for me, maybe half a dozen times in 30 years, 10 amps of charger will do me just fine.
Charging from the Engine Alternator
On most of today's RVs charging the house batteries from the engine is an automatic function through a solid-state battery isolator. But like many people that have worked in the world of computers and automation, I don't really trust 'automatic' things all that much, so when my isolator started acting up I
replaced it with a manual switch.
This means that the only time the engine alternator charges the house batteries is when I want it to, which is not very often.
When I'm on the road, as in actually driving, the solar panel is mostly out from under trees and producing a decent charge anyway. And I trust the solar charge controller a lot more than I do the regulator on the engine alternator, which, when you think about it, is tuned for charging a starting battery and not a deep cycle battery. On top of that, for the general safety of all the electronics on-board the modern vehicle, alternator regulators are often set for about 13.8 volts max, which is just not high enough for a decent deep-cycle battery charge, especially when you account for that sneaky little, but often ignored, fact that every solid-state device, including that isolator, creates some small voltage drop when current flows through it, reducing that 13.8 volts by at least another few tenths, at worst up to 0.7 volts. That might not sound like much but in the world of batteries, a small change in voltage has a big effect! (The difference between 50% discharged, 12.18 volts, and fully charged, 12.63 volts, is less than half a volt!)
One place where the engine alternator can be useful is when I'm dry-camped for more than two or three days in a solar-challenged location. Then I might start the engine, take the little plastic key for the manual switch from it's storage space, and use it to connect the house batteries to the engine alternator. But even then I'll only use the alternator for charging under certain circumstances.
- Only where generator use is allowed (Idling engines are considered generators in this context.)
- Only at times that will be least disruptive to those around me, usually mid-day, or if someone else in the area is running an even louder generator.
- And only when the battery can take a bulk charge.
 |
| This above-looking-down photo shows my manual disconnect switch mounted on the back of the driver's seat pedestal and here the plastic key has been used to close it and connect the house batteries to the engine alternator. The long yellow cord attached to the key and looped over the passenger seat arm-rest is to make sure I don't forget that I have the switch closed. |
The bulk charge thing is important. (Note, all the following also applies when charging from a generator.) Charging off an idling engine is expensive and gets even more expensive if it's not being done efficiently. Even at idle speeds the engine alternator can put out a surprising amount of current, but the closer the house battery is to charged, the less charging current it will accept and any left over alternator capacity is just wasted.
A battery able to accept a bulk charge, just plain brute amps (But as a rule, never more amps than about 25% of the rated capacity of the battery or you risk cooking it!) at the max voltage the regulator will allow, will make most efficient use of the idling engine (or running generator.)
For that reason I don't resort to this charging method until my battery is down by 70 to 80 amp-hours. At that point, with about an hour's worth of idling I can stuff a good 30 amp-hours of juice back into the battery, all of it at the most efficient bulk-charge rate.
After that though I'm getting close to the the absorption portion of the charging cycle where the regulator/charge controller lowers the voltage to limit the number of amps going into the battery so it doesn't cook. So now that whole charging efficiency curve starts deteriorating fast! Besides, after an hour of monitoring the idling engine and the battery every 10 minutes or so to make sure nothing is going wrong I'm pretty much over this game anyway.
If I have to, I can run the engine for another hour the next day, but then again, by then the sun might be out.
Charging chart for my 200 amp-hour rated battery bank:
| Amp-hours
used |
Level of Charge |
Charge type (Speed) |
|
|
|
| 0 |
100% |
Trickle/Float (Almost stopped) |
| 20 |
90% |
Trickle/Float (Almost stopped) |
| 40 |
80% |
Absorption (Getting slower) |
| 80 |
60% |
Bulk (Fast) |
| 100 |
50% |
Bulk (Fast) |
|
|
|
One final note on charging from the engine alternator. If I'm hitting the road with a heavily depleted battery I might connect the house batteries to the engine alternator for an hour or two as I'm driving just to give the solar system a head start on recovering a full charge, but no more than that since, as I said before, the voltage I'm getting off the engine alternator is just not adequate to properly charge deep cycle batteries.
Using my 12 volt power
Of course there would be no need for managing my 12 volt power if I wasn't using it.
Now somewhere inside my twisted little brain lurks a need for maintaining a reserve (Spare parts on the shelf, money in the bank, water in the tank and power in the battery) that borders on pathological, but I have managed to overcome this challenge, to a degree, and I do consume power.

My largest power consumer is the fridge.
A Norcold 3.7 cf. compressor fridge that runs on either 110 volts or 12 volts.
As I've explained previously, most of the time the fridge is running off of 12 volt power and it draws around 3 to 3.4 amps, depending on whether the thermostatically controlled muffin fan that assists with airflow over the condenser coils when things heat up has kicked on or not.
If it ran continuously my fridge would consume 75% of my usable battery
capacity in 24 hours, but of course it doesn't run continuously, it
cycles on and off.
How much depends on several factors.
 |
| No solar input and only the fridge running |
One being the weather. The hotter it is the more the fridge runs. There's not much, short of moving to a different climate, that I can do about this, but fortunately no matter what the climate, things usually cool down a little at night. This is helpful because the fridge doesn't have to work quite as hard during those hours when I have no incoming solar to offset its power consumption.
Another major factor in how much the fridge runs is the boob holding the door open.
Being a front-opening fridge, all the cold air just falls right out of this
son of a bit this male puppy every time you give it half a chance!
I can do a couple things about this.
First, and most effective, I keep most of my food-stuffs in the fridge, whether they need it or not. (Am I the only one who refrigerates a can of beans, teabags and boxes of cereal??)
Compared to a residential fridge this one is pretty small, but the more stuff I keep in it (Up to the point of reasonable organization and room left over for convective airflow to keep everything inside uniformly cool.) the less air there is to fall out when the door is open, and conversely, the less room-temp air that has to be cooled back down again once the boob on the outside shuts the damn door!
A chilled can of beans might gain a fraction of a degree while the door is open, but the air rushing in to replace all the cold air that fell out could be 20 or more degrees warmer, all of which has to then be cooled back down again. (Another trick along these lines from back in my grandparent's day is to take up the empty air space in the the fridge with something dense and 'chill-able' like a bundle of newspapers, but my fridge is too small to have that kind of space left over on a regular basis.)
Second, I can
shut the damn door!!!
When I was growing up it didn't matter whether it was the ice-chilled cooler at the campsite or the fridge at home, my parents where always - well, let's say quick - to remind us to keep the door shut, and I can still hear their voices today. (My wife is much more leisurely about fridge door hang time and when she's getting things out for dinner at the house I'll sometimes catch myself muttering shut the door, shut the door, SHUT THE DOOR, under my breath.
The Van's fridge is small and I pretty much know where everything is inside there, so when prepping for a meal I'll pause for a moment and make a mental list of what I need from the fridge, then I'll snatch the door open, grab everything I need and quick-like, shut the door again. OK, maybe not quite as extreme as that sounded, but you get the idea.
Once the cold stuff is on the counter, it stays on the counter for the time it takes me to finish with all the cold stuff I have out, which is as quickly as I can so things have the least amount of time to warm up, then I reverse the snatch-n-grab procedure to get it all back into the fridge with a single door opening.
It may be a bit obsessive, but there are a few other things I do in an attempt to keep the fridge power consumption as low as much as possible.
These small fridge/freezers are never going to match the freezer temperatures of residential fridges (We run our freezers at the house in the -5 F range.) so I don't even try. Instead I have remote-read thermometers in both the fridge and freezer sections (More expensive than the cheep dial thermometer but I don't need to open the door to read them!) and my goal is to keep the freezer no colder than the high 20's, which keeps the fridge section in the high 30's - low 40's area. (No separate temperature controls on these small single-door fridges.) Colder than that isn't gaining me anything except increased power consumption and frozen lettuce, neither of which is very palatable!
I also try, whenever possible, to restock the fridge with pre-chilled items. Drinks from the cooler rather than from the shelf and frozen veggies rather than canned.
Of course it's difficult to find pre-chilled potatoes or cookies, or lots of other things I like to eat, so whenever possible I do my grocery restocking first thing in the morning so the fridge has all day to run on surplus solar power while it's catching up. This minimizes it's impact on the battery.
Besides, it usually takes the mom's with little kids a while to get everything in gear after the older ones head off to school, so shopping early means I can be in and out before they show up to clog the aisles. -- I swear I just don't understand why it's so difficult to grasp the concept of parking the cart out of the way rather than just abandoning it right in the middle of the aisle so no one can get by (As a male shopping alone you do NOT
EVER want to move someone else's cart out of the way when it has a child in it!!!!) while they leisurely contemplate the question of name-brand or house-brand as if they were the only person in the world!!!!!!
Anyway. . .

I recently did a 'driveway test' of the fridge under less than ideal conditions. It was one of those last-gasp-of-summer days, (The thermometer inside the van topped out at 98F) The Van was sitting under an oak tree which shades the solar panel through the mid-part of the day, it was partly cloudy, and the fridge was empty except for three liters of warm water.
When I turned the fridge on it, and the water in it, was at 85F so it took continuous running for a good part of the day to get the air and water chilled down to about 40 F.
I started with a fully charged battery and the next day, 24 hours after I turned the fridge on, with the freezer at 27 degrees and the fridge at 39, the battery was down about 40 amp-hours.
This was pretty much a worst-case scenario and as I said before, it's more common for the battery to be down by only 20 - 35 amp-hours come morning, but clearly the fridge is
the significant consumer on my 12 volt system.
 Next in the hierarchy of power consumers is the vent fan.
Mine has three different speeds that range from annoying to holy-crap-that-plane-is-going-to-land-on-the-roof!
 |
| No solar input and only the vent fan running |
At low speed, the only speed I use, the fan draws a little less than 2 amps. Fortunately the prime time for fan use is usually during daylight hours so I can run it pretty much penalty free off of surplus solar. ( Don't worry I'll get to what I mean by surplus solar in a minute.)
If I do need to run it outside of daylight hours it will typically be for a few hours when trying to settle in for the evening, so the power cost might be around 4 to 6 amp-hours at most.
Next on my descending list of power consumers is my laptop. I use it some evenings to watch a DVD from my collection and the internal battery will last 1.5 to 2 hours for this, after that I need to plug it in (I use a 12 volt charger) and when I do it draws about 2 amps. So let's call that 4 amp-hours on a bad night.

All the lights in The Van are LED. The two work lights over the counter and the two reading lights, chair and head of bed, all draw 0.2 amps each. Like keeping the fridge door shut, I'm also a stickler about turning off lights so only have one of these on at a time. This means that during a long winter evening I'll use about 1.2 amp-hours for lighting.
Now I do have eight recessed LED lights in the ceiling, all operated from a single switch, and these things are landing-lights bright! And to be this bright they suck down a cumulative 2 amps, but since I only flick them on long enough to find something in the otherwise light-less rear of The Van, typically less than a minute a night, I don't count them against my stored power. The same for the 12 volt demand pump which also runs for less than a minute a night.
 |
| Inverter, charging a camera battery. |
The only other frequent 12 volt load I have is my little 100 watt inverter which I use to charge camera and GPS batteries. Now when I plug this thing in, even without a load on it, a motor starts spinning, a loud motor, and my initial thought was crap that thing is sucking some heavy juice! But in reality, with no load the inverter only sucks down 0.2 amps, despite all the racket, and with a load, a dead camera battery for instance, the total draw is 0.4 amps.
If I ran this all night it would, 1) drive me nuts with that spinning motor whine, 2) potentially suck down nearly 7 amp-hours.
But I usually don't use it at night. I have 4 sets of GPS batteries and 3 camera batteries so it would have to be one heck of a day for me to use those up and need to get at least some recharged before I set out again in the morning.
Instead I reserve use of this inverter for when I have surplus solar power available. (It's not actually free as some call it but that's a
whole 'nother post from my other, now inactive, blog.)
OK, I've mentioned it several times now, but just what the heck do I mean by surplus solar? Well I'm talking about how solar systems actually work.

Remember this photo from earlier in this post? This is where the battery is fully charged and taking 0.4 amps, the monitors are taking 0.1 amps and the remaining 0.4 amps is being used by the inverter charging GPS batteries and so I'm getting slightly less than 1 amp out of the solar system.

Well this photo was taken a few seconds later, after I turned on the fridge, the vent fan on high, and all the lights.
All the sudden I'm getting 8 amps from the same solar system under the same sun conditions.
Magic!
No, just physical science.
And this is what I call surplus solar.
It's a sunny day and just because the present load isn't using very much power (First photo) doesn't mean it isn't lurking there in the background.
This is why I don't worry much about running the vent fan for hours in the hottest part of the day. This is why I do my small-battery, laptop and phone charging during daylight hours. And this is why running the fridge during the day usually doesn't count against my house batteries.
I'm tapping into a power surplus that I would not otherwise be using for anything else, a surplus that would otherwise just be lost to me. You've heard of buy-back programs where electric companies buy the excess from house-mounted solar systems? Well I think of this as the RV version of the buy-back program. Power in my pocket!
Wrapping it up: Finally! (said with a breathy, exasperated sigh)
Clearly I rely most on my 12 volt system when on the road and there are some modifications I could make to it that would give me more 'hang' time.
It might seem like the obvious mod would be to add more battery capacity and if I frequently found myself running up against this limit I would consider doing just that. It's not that I never run up against the 100 amp-hour limit of my current batteries, but that is a rare occurrence so the cost, space-requirements and weight of additional batteries just don't make sense. (I know it's almost anti-American, but bigger isn't always better!!)
I could increase my solar capacity. After all, even though over time that single 180 watt panel produces more power than I use, sometimes it does fall short of what I need in the short term. My charge controller is rated for up to 25 amps and adding another 100 watts of panel would still keep me well below that limit. There's no more room on The Van's roof so a portable panel would be the solution here, especially since I might be able to get a portable panel into full sun when The Van's fixed panel is shaded, one of my major 'short term' issues. So next time I have an extra couple hundred bucks laying around I just might think about it. But no rush since I can clearly get by on my existing systems.
So that's my power management strategy.
It might seem complicated, after all, it took a fairly long, wordy post to describe it, but in practice none of the individual steps in my power management strategy are complicated or take more than a few seconds at a time, and to be honest, I often don't really think about it since it's just second nature.
To quote someone famous, 'freedom isn't free'; but if the cost of having power when I need it, where I need it, is a little deliberate management and a few moments of my time, it's well worth it.
This exact strategy won't work for everybody, but with a little understanding of the underlying concepts, it could be tweaked to fit most any reasonable power needs.