
It's been slightly more than three years ago that I replaced The Van's air-conditioner with a MaxxFan 7500K Deluxe powered vent and I haven't regretted the decision once.
Oh there have been times, such as when I camped in triple-digit temperatures just this year where I wouldn't have refused to turn the AC on if it was still up there on the roof, (Of course there were no hookups in that campground so the powered vent was much more useful anyway) but life is one long series of compromises and I am still happy with my decision.
 |
| I'm pretty sure it's not supposed to look like that! |
But one day recently, when closing the vent for The Van's monthly exercise run to town and back, there was some loud clacking that I'd never heard before, and the lift-motor wouldn't stop running until I grabbed the manual knob and held on tight. (There are no stops in the lift mechanism itself, instead the control board looks for high current, which indicates a motor-stall, before shutting off the power.)
Something had gone seriously wrong with the lift mechanism and no matter how many times I cycled it from open to closed and back again, it just refused to fix itself.
 |
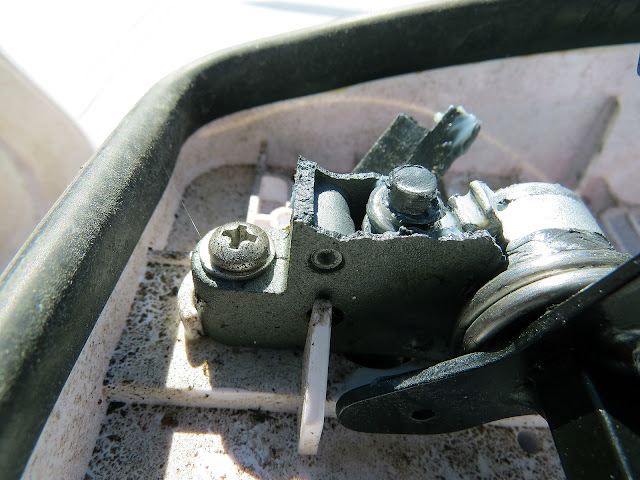
| The one in the upper left is what it's supposed to look like. The other one is what mine looked like. |
Some internet surfing turned up the fact that if these MaxxFans have a weak-point it's either the push-button control board or the lift actuator. As you can see in the photo above, in my case it was definitely the actuator which had suddenly blown itself into enough pieces to fill a puzzle-box. (The actuator is easier to replace than the control board so if something just had to break I got off lucky.)

The short-term fix was to remove the screen (easily done by hand) and the fan-blade assembly, (quickly removed by loosening the set-screw with a 3/32 Allen key)

then cut a scrap of wood to length and jam the lid open with it before putting the fan blade and screen back.
By the way, removing the screen and fan-blade assembly then reaching up past the four motor-supports is also how I go about cleaning the inside of the vent cover without having to climb up on the roof, which I try to avoid where possible.

During some internet wandering I found a PDF parts manual for my fan (which I have since downloaded and made a permanent part of The Van's folder which contains all the manuals and such to the many different parts that make up it's systems.)
With the part number from the manual in hand (There are two different lift actuators, one with a long shaft for the manual version and another with a short shaft for the electric-lift version) some more surfing turned up etrailer.com which had my part - for a price!
Apparently a year ago they were selling this part, which largely consists of pot-metal which explains why mine blew up into so many pieces, for about $15. I paid closer to $40 for it. (November 2020)

Since the MaxxFan cost about 10 times that much I ordered the part anyway and while I waited did some more searching which turned up one single, somewhat helpful but not exactly meticulously detailed youtube video on replacing this part.
Fortunately, though this was never mentioned anywhere, and I couldn't find them on-line, the part also came with printed, detailed replacement instructions.

Subtracting the time I spent cleaning everything since I had it opened up anyway, the replacement took about 15 minutes, 20 if I include tucking tools and cleaning supplies into my pockets and carrying the ladder out to The Van.
With the lid open, or in my case, propped up, from up on the roof the two screws that hold the rain-shield to the vent cover are easily accessible.
With the screws removed the rain-shield drops down out of the way and allowed me to reach in and slip the lift-arms out of the slots in the vent cover, careful to keep track of the plastic bushings that are involved. This then let me lift the cover up and out of the way.
Removing two more screws over on the left let me remove the lift arm assembly. And a final two screws over on right let me remove the remains of the old actuator.
That's 6 screws but each pair is a different size so I made sure to keep track of which went where.
Oh, and all these screws seat into plastic so tighten snugly but don't over torque!

With the new actuator in place I transferred the lift-arm assist-spring from the old actuator to the new.
That spring is held on with a bolt so bring some small pliers up on the roof to hold the nut. (fortunately I anticipated this before climbing up there the first time) The only other tool you need for the entire replacement process is a Philips screwdriver.
The instructions detail a very simple procedure for pre-setting the actuator to ensure the proper range of motion once it's installed, but the splined shaft of the actuator still has to fit down into the motor's socket. That youtuber pointed out that it's handy to have helper down below to slowly turn the motor with the manual knob until these two parts slip together. Since I work alone I just left the screen and fan assembly off so I could reach down through the opening from the roof and turn the knob myself.
 |
| Yes, there's still some dirt there in the tiny little corners but I'm not OCD so good enough! |
With the arms parallel to the roof as instructed and hex-end of the lift arm assembly inserted into the new actuator over on the left, I replaced the retainer over on the right

then reached back down inside and turned the knob to raise the lift-arms up to where I could spring the other ends back into the vent cover brackets.
Then reached in one more time to lower the vent-cover far enough to screw the rain-guard back on before very gingerly easing myself over the edge of the roof, back onto the ladder, and finally the safety of ground.
If I had been thinking (Oh damn! What a concept!) I would have brought the remote control up on the roof with me so I could make sure everything was working properly before I made the risky climb down, but fortunately all was well and I didn't have to go back up again.
But then again, the remote is line-of-sight-IR so wouldn't have worked from up on the roof anyway. Once again I get away with not thinking!!
The fix was quick and straight-forward, but as pricey as the MaxxFan was initially, as well as the replacement part is now, I would have hoped for a ductile stamped-steel actuator housing rather than the brittle pot-metal housing it comes with.
Oh well, it is what it is and it's not like my other vent, the Fantastic Fan, hasn't needed some repairs over the years as well.
I do envy your mechanical aptitude, which greatly exceeds mine. Nice job describing the process. My used Scamp came with air conditioning but not the fan. Many times, I wished for the fan instead.
ReplyDeleteThe Brother, the real mechanical genius of the family, would damn near kill himself laughing to hear me described as having mechanical aptitude. My welds break, I have to get the calipers out to tell the difference between a 1/2" and 5/8" bolt, and just last year I gave away a 4-wheeler because I couldn't keep the simple one-cylinder engine running.
DeleteI had one fan and one AC on The Van for several years and used the fan far more than the AC, so I ditched the AC and replaced it with the Maxfan. (Fan and AC both fit the same roof opening.)
When all this settles down come-on down and I'll help you make the swap, but you gota take your AC away with you. I already have one of those gathering dust on a shelf.