Friday, October 3, 2014

Well that's not good!!


When I flicked the switch to open the vent in the van this morning following the predicted storms of last night, the motor sounded pretty anemic. (The rain sensor that normally opens and closes the Fantastic Vent automatically has given up the ghost, but replacements parts are on the way, at no charge to me thanks to Fantastic Vent's very good legacy warranty of 7 years. (I think the new warranty, now that they are part of Atwood Mobile is 2 years but I will still be a customer.))

After countless times listening to that motor open or close the vent I know what it should sound like and this wasn't it!


The van has been sitting for a few weeks now with only parasitic loads on the electrical system from CO2 sensors and the like, and those only overnight when the solar panel is dormant, so there was no reason for that motor to sound the way it did!

I immediately checked the E-meter and the charge level was at 97.5%, right were I would expect it to be first thing in the morning under these conditions, yet the battery voltage was only 11.02 volts. Not good! Not good at all!!


Note that the charge percentage is figured by the E-meter based on current out verses current in against the size of the battery, where the voltage is based on, well, measured voltage.

Despite the fact that manufactures continue to sell simplified 'battery' meters, which are nothing more than voltage sensors, or even worse, the little plug thingy with full/normal/low lights on it, for attractively low prices, they don't work!

Unlike a fuel tank which can be checked with a simple level gauge, true battery state can only be determined reliably by combining current in/out data along with voltage, and it also helps if you have a bit of experience at it, such as frequently checking the readings under different conditions so you know what they look like when everything is working properly.

Anyway, my initial look at the battery state was before the sun was up, and by the time I finished some other chores and got back to the van with the camera in tow, the sun was climbing over the treeline and the solar panel was starting to tick over. So now the battery charge was back up to 100%, yet the panel was still shoving 3.5 amps into it (Should have been more like .5 to .8 amps.) and the voltage was only 12.55 volts. (Should have been more like 13.4)


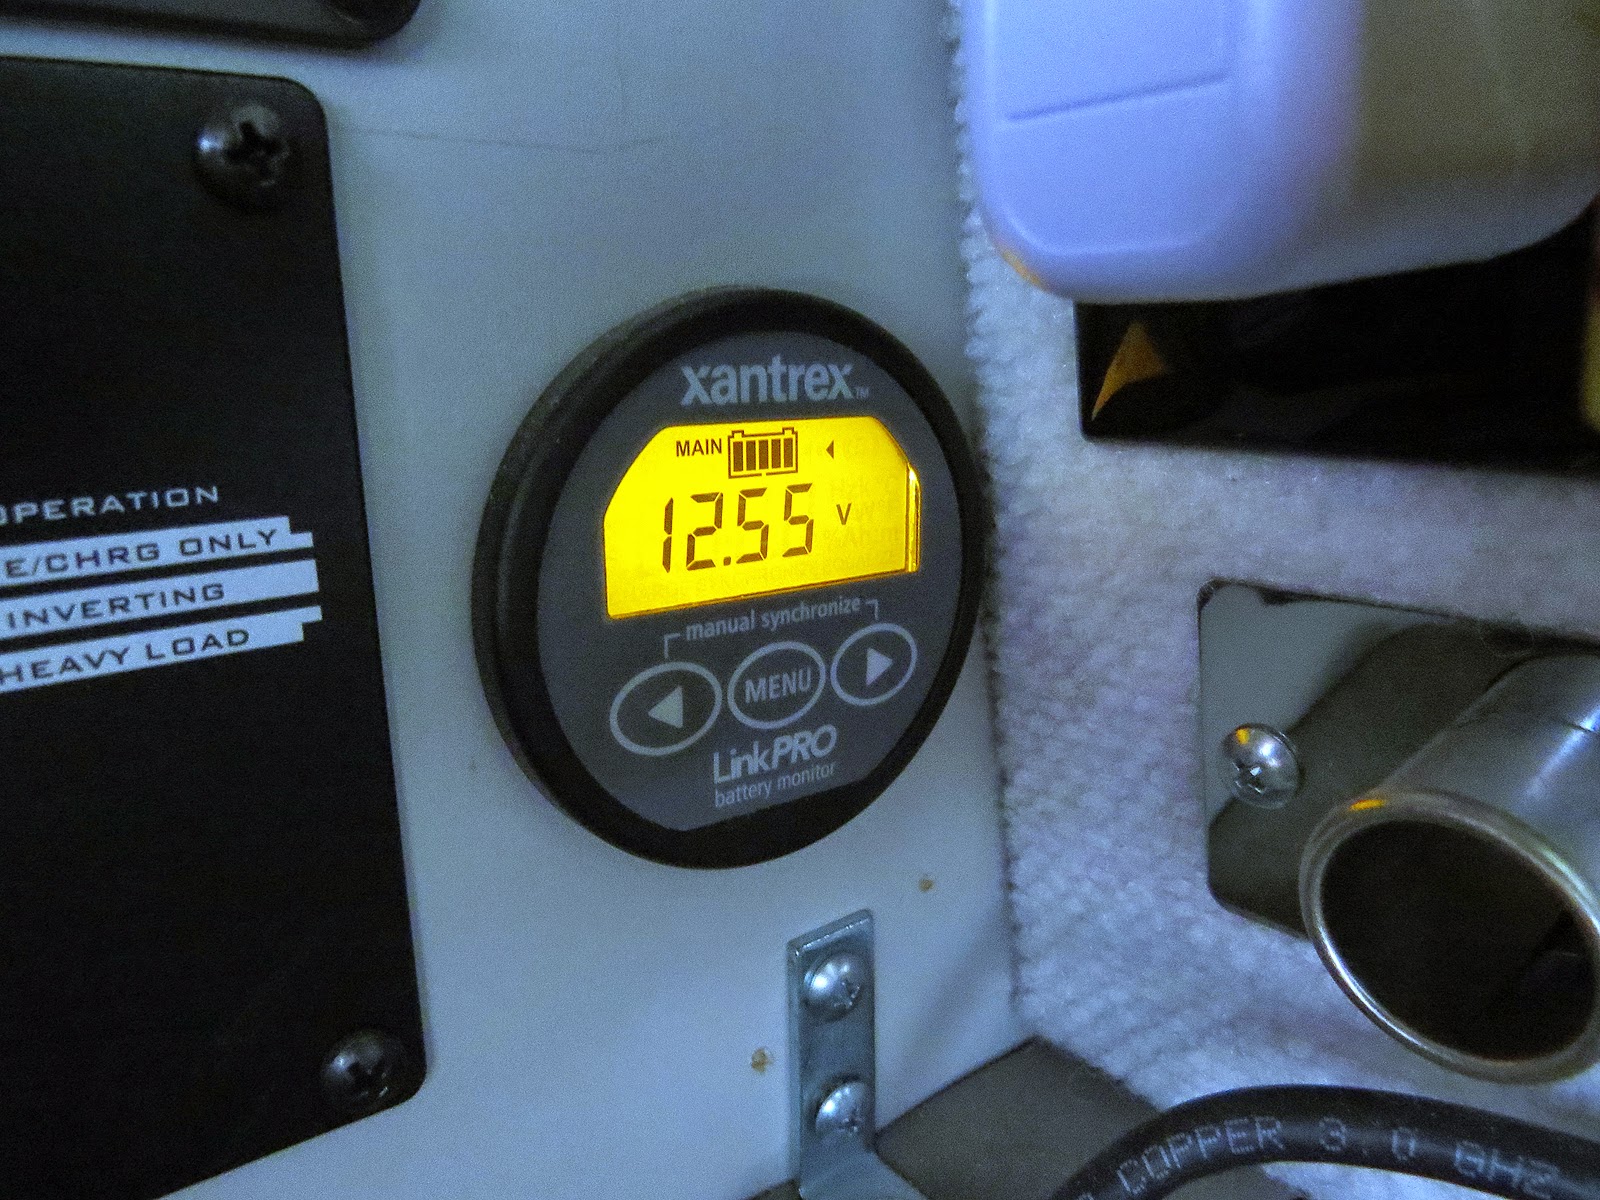
Now I could have just blamed that voltage reading on a faulty sensor in the E-meter but the solar charge controller, right there next to to the E-meter, has a switch to display battery voltage as well as panel and output current, and the two meters pretty much agreed that the pooch had been screwed.

Because, if this was just a resting battery 12.55 is a reasonable, though not great, voltage, but with the solar kicked in like that, it sucks!!


Not that I'm terribly surprised. I use the heck out of my batteries and I've been noticing a decline in battery health for about 6 months now, but it does seem like the end came a bit precipitously, and right when camping season down here in Texas is just kicking in!

Only thing to do is get right on it.


 First I removed the bed, which is as simple as removing two nuts, (Then making sure you don't damage your own nuts when lifting it out!) to get unfettered access to the battery boxes. The two white boxes in the photo above are the sealed and vented battery boxes while the ribbed silver thing is the shore-power charge controller/inverter. The rest of that stuff over to the right on the other side of a divider is just some of the crap I keep stored under the bed.


Next I pulled the gasketed lids off the battery boxes.

Mud daubers are just a fact of life here so I wasn't surprised to see that they had been coming in through the box vent, but that wasn't my problem. Life's never that simple; though I did add nylon scrubbers to my shopping list. I'll cram one into each of the vent pipes to stop the wasps while still allowing airflow.


The next step was to remove the positive leads from both batteries. Now there's always a lot of discussion on which lead, positive or negative should be removed first. In the case of an auto I agree with the majority that the ground should always be removed first, but an RV, especially an RV with solar, is a different animal and I'm more comfortable de-enrgizing the system the way I'm describing, though I don't go so far as to claim it's right.

These batteries are connected in parallel so the first lead removed is still, in effect, connected to the other battery, so a little bit of care is a good thing here. I used gloves and a full face shield and carefully taped each lug as I removed it so there's little chance of an accidental short.


With the positive leads removed I left the batteries for a moment and moved up to the solar charge controller, the back side more specifically, which is hiding inside a cupboard behind the small box in the photo above.


What I was doing was disconnecting the solar panel from the system because, even with the batteries disconnected, the whole system is still energized by the solar panel whenever the sun is shining.

They are a little hard to see in this photo but there's a white and black wire there that used to be connected to terminals 3 & 4 but which are currently removed and taped up.

Coincidentally, when we were in town earlier this week I wandered into our local NAPA store looking for a small battery disconnect switch that I could wire in here so I don't have to remove wires from lugs, but the only one they had in stock at the moment was a monster rated for over 100 amps.

The reason I remove the battery leads first is because that's where most of the energy lives, in the batteries, like a hundred amps or more worth! (Ever seen a farmer weld a broken part with the battery in his truck?? Just imagine yourself or delicate electronics on the end of that spark instead!) With the batteries disconnected I feel like it's just a little bit safer to be up there messing with the solar panel which is limited to around 15 amps max if shorted in full sun. 


With the whole 12 volt system de-energized now, I went back and removed and taped the two ground wires from the batteries then peeled the temperature sensor off the top of one of them. This sensor is connected to the shore-power charge controller which adjusts it's charge profile according to battery temperature. This is typically a sign of a good, gentle charger.


Then it was a simple matter of lifting each battery out so they're ready to be turned in when I buy the replacements so I don't have to pay the core charges.

The sharp-eyed will note that these are AGM batteries. If you don't know what that means the simple explanation is that AGM's were originally designed for jet fighters where the batteries are often upside down and subjected to a whole lot of stress and vibration.

They are very robust and, in theory, their use in RV's is a step up from lead-acid batteries and should provide more reliable service. I've been using them in the past several rigs but I'm rethinking that now.

After replacing three sets of AGM's over the years, with my type of usage I can see no increased life out of them compared to the lead-acid batteries I used before. In fact the set of AGM's I just pulled out is marked as having been put into use in February of 2011, only three and a half years ago. I have easily gotten 3.5 years, and usually more, out of deep cycle lead-acid batteries that cost only half as much and are more readily available!

I did some research this afternoon and found that the group 27 deep cycle batteries marketed by Sam's Club (Energizer), Wallmart (Everstart), NAPA (Premium Marine/RV) and others, are all made exactly the same way, to the same standards, in the same USA based factory, the only difference being the label slapped on them at the end of the assembly line.

Since I can pick up a pair of these from Walmart for $164 or a pair from the local NAPA store for $202, instead of the $460 I would pay for a pair of DEKA AGM's, assuming I can find them, guess where I'm headed when we make our next trip to town. (Walmart has a better warranty as well as price than NAPA but it's a long way to the next store for us so I'll buy them where I can find them.)

If my decision to go back to lead/acid proves faulty they only have to last 2 years for me to break even on the deal. Worth a try to find out if I've been paying more than I need to for reliable batteries. All I have to do is remember to switch the shore-power and solar chargers from AGM to lead acid mode so they're using the proper charge profile.


Thursday, October 2, 2014

What if: Size does matter!


 (You didn't think I was talking about THAT size matters issue did you??)


By building to generic dimensions I’ll, hopefully, be able to get the camper into any somewhat standard pickup bed. If the bed isn’t standard I’ll just avoid that truck.

So what are generic dimensions for a slide-in shell?  Well the lower portion of that is pretty much dictated by the shape and size of the pickup bed and during my research I found a site with technical documents on Ford pickups that went back to the year 2000. After combing through them this is what I have for the ‘standard’ pickup bed. Where there were variations in dimensions over the years, which were actually very slight, I chose the most restrictive.

Before I move on I want to point out that, research aside, if and when I get to the point of building this camper I will first confirm all dimensions against an actual pickup because it would be really annoying to have to take an inch out of the middle after the whole thing is built!!

Pickup Bed Dimensions:

Length                                                        96”
Width between wheel wells                       50”
Length to behind wheel wells                    71”
Tailgate opening                                         60”
Bed-rail height                                            20”
Overall width (to outside of body panels)  80"
Cab roof height above cargo floor              45”

My accurately dimensioned but crude rendering of a generic  pickup bed

And from this, for a camper shell that will fit the ‘standard’ pickup bed, I came up with:

Floor width, (Where it needs to fit between the wheel wells): 48”

Leaving 1” of clearance between the wheel wells on each side of the camper shell gives me a total of 2” of play for backing the truck under the camper. Which doesn't seem like a whole lot when trying to guide thousands of pounds of truck under more than a half ton of camper, but compared to some I’ve dealt with, not too bad either. I had one camper with one quarter of an inch total clearance, one eighth of an inch on each side! Now that was a difficult camper to load!! But since I designed and built the thing myself I guess it was my own fault. . .  Anyway after that, 2" should feel downright decadent.

Distance from front wall to behind wheel wells: 72”

Since the front wall of the camper is going to come up against the front of the pickup bed and stop me anyway, I only allowed an extra inch of clearance for this dimension. Worst case, if I screw up then a little blocking along the front wall of the camper shell where it contacts the front of the pickup bed will solve the issue, though that will also shift the center of gravity towards the rear and that needs to be watched!


Floor width, behind wheel wells: 58”

I had the option of leaving the floor width of the shell 48” for the entire length front to back and the simplicity of this has a certain attraction, but I chose to accept the complication of widening it out to 58” aft of the wheel-wells. That might seem like a lot of complication for a mere 5” increase in width per side for the last couple feet, but that change allowed me to move the toilet from the under the bed up front to next to the back door. More on that later.


Height to clear bed rails: 21.5”

Keeping this dimension, the height at which the camper shell ‘wings’ reach out over the pickup bed sides, as close to the floor as possible helps with seating height inside, but I didn’t want to get into a situation where the ‘wings’ sat down on top of the bed rails before the floor sits down on the bed bottom.  If it were to happen it wouldn’t be a disaster or anything, all I’d have to do is add blocking to the bottom of the shell to fix the issue, but I also want the shell to sit as low on the truck as possible, so I’d rather avoid having to add any blocking like that.

To that end I set the shell wings 1.5” above the top of the pickup bed sides.

Width of upper portion of camper shell: 88”

Now that I’m up above the bed rails I'm not so limited anymore. In fact I could go as wide as the pretty common RV width of 102", except that legaly there's a problem with that.

Don't expect the RV dealer to tell you this but something like 19 states have varying restrictions on 102" wide loads. Basically as long as you stay on, or within a few miles of the Interstate, which is under federal control, you're good. Outside of that you're fair game in a significant number of states.

True, there doesn't seem to be any real enforcement of the 102" width ban, at least for RV's, but if Billy-Bob-Yahoo is blasting down one of these restricted roads in his $200 rattletrap Pinto talking on his girlfriend's mother's 'borrowed' cell phone and drifts into your lane, sideswiping your 6-figure, over-width RV, he just might turn up in a body cast toting along a savvy lawyer that is intent on turning the whole thing back on you for endangering his client by operating an illegal vehicle.

I personally don't see the upside of taking the risk.

But then I have no interest in going that wide anyway because, in terms of fuel economy, less is more once you get any wider than the pickup cab.

In my case the ruling factors for width were the length of the crosswise bed and fitting the jack system.

Unlike traditional camper-jacks which hang on the corners and can use hinged extensions on the front jacks to temporarily clear the sides of the pickup bed for loading and unloading a narrow camper, the Stable Lift system I want to use requires enough width in the camper shell that they can fit under the edges of the 'wings' and still clear the pickup bed.

I decided to allow for ~ 2” of clearance on each side between jack-tubes and bed-side. This is slightly more than the internal clearances I allowed for between the wheel wells which creates a small built-in safety feature during loading and unloading.

The thinking is, assuming I'm backing in somewhat straight, I'll run the side of the camper shell into the inside of a wheel well before I have a chance to slam a jack into the outside skin of the pickup bed. Of course this is mostly a psychological safety factor since it only starts working once I've backed in far enough for the front of the camper to reach the wheel wells in the first place.But hey! I'll take all the help I can get!!

Allowing for 2” jack tubes and no cantilever (The jack tubes fit completely under the edge of the camper shell without sticking beyond at all.) the total width of the shell comes to 88”. After deducting 4” for wall thickness the inside width is 84”. This is clearly wide enough to accommodate the crosswise bed I want so let's stop there.

Overall shell height:  81.5”


OK, one thing I’m not a fan of is over-cab beds, slide in campers or class C's, doesn't matter. Either way they’re a pain to get in and out of, and even worse to make up, especially if you’re aging; and who’s not?

By opting to forgo the over-cab bed, instead of designing for adequate overhead clearance for said bed, the ruling factor on the height of the camper shell then becomes standing headroom.

I know that in general we’re growing taller, but last time I checked, I’m as tall as I’m going to get. The van has 6’3.5” of headroom which I find plenty so the shell will have 6’4” (Didn’t want to mess with that half inch.) Allowing for 2.5” of floor thickness and 2” of roof thickness + 1” of roof bow (to ensure water runoff.) sets the overall shell height to 81.5".

Yes, as a 5'10", and shrinking, person, in theory I could have lowered the roof even more, but that's in theory. I've found that the real world requires a few extra inches over the top of my head to be truly comfortable. (It also keeps the knob for the roof vent from creasing my already convoluted skull!)


To overhang or not to overhang??:

That is the question.

Since I’m not putting in an over-cab bed I have the option at this point of leaving the front wall of the camper shell an unbroken vertical, but, with the roof of the truck only being about 45” above the floor of that pickup bed the 81.5” tall camper will be sitting in, that leaves pretty near 3 feet of forward facing verticality to punch through the air at highway speeds.

I could mount one of those adjustable wings on the roof of the truck to push the air up and over. Despite being somewhat clumsy this would greatly simplify the construction of the camper shell, but by building the ‘fairing’ into the shell itself I can add some significant storage space ideal for light things like extra bedding and a basket or two of socks and underwear, and when the camper is off the truck so is the fairing, all in one easy step.

I don’t want to leave a lot of room between truck roof and the bottom of the overhang that 65 MPH air can get trapped in, but of course I also don’t want the overhang rubbing on the truck roof when the frame flexes over rough roads either. Opting to play it safe, in keeping with the generic fit plan, I allowed an additional 2.5” and set the bottom of the overhang at 47.5” above the shell bottom.

Shell length: 105”
Yep, that's 19.8' of camper in an 8' pickup bed!

Some manufactures today are building slide-ins with an overall length of nearly 20' and floor lengths just short of 12', with the whole thing weighing in at over 4000 lbs empty(!!!) but that’s just way too much for what I want to accomplish.

If I limit the shell length to 95” it will fit completely inside the bed and I’ll be able to close the tailgate on it. But what does that really do for me?

To paraphrase DOT requirements on securing loads, you should be able to turn the vehicle upside down and have the load stay in place. Yeah, I know, there’s a lot of loads going down the highway out there that clearly don’t meet this requirement, and I guarantee that the insurance companies like it that way since it gives them grounds for denying a settlement. (Especially if you've already introduced them to Billy-Bob-Yahoo and his lawyer in a previous event!) Me, I don’t want to be one of those careless people endangering the others around me.

So the ability to close the tailgate on the camper doesn’t really help much as far as securing the load; and I have nightmarish thoughts of someone stumbling along in a truck stop parking lot in the wee hours and running into the open tailgate then slamming it closed in anger, trapping me inside the camper.

So as far as I’m concerned there’s not much of an argument for limiting myself to tail-gate-closing-length and at least one for not doing so.

If I discount the last 24" of rear storage area in the van, the remaining floor length is about 105”. That may not sound like much of an increase over the tail-gate-closing 95", but the pull-out pantry in the van is only 9" wide yet I can get a whole heck of a lot of stuff into that space. So, although it’s a little arbitrary, I settled on a floor length of 105”

Now if I chose to leave the tailgate on and lowered when carrying the camper, which I don’t think I would but at least I have the option, the shell is long enough to prevent the tailgate being closed yet short enough to leave about a foot of tailgate/porch exposed so my foot won't slip off as I step out. If I choose to travel without the tailgate (One night many many years ago, unbeknownst to me, one of the local TV news stations decided to show how easy it is to remove a pickup's tailgate and steal it. The next morning mine was gone. . .) the camper shell is still short enough to end right about even with the bumper and therefore won’t interfere with towing something on a standard receiver hitch. In either case, tailgate on or off, this overhang is short enough that the truck’s taillights are not obscured by it, eliminating the complication of wiring the shell for lights.


So now I have size, next will be a look at shape.


Wednesday, October 1, 2014

What if: Keeping it under control

(Two posts in one day!! That's either a record or an obsession. . .)


This might seem like an odd step in the design process, but I'm easily distracted and tend to wander off on tangents (If you could see me hiking you'd know the truth of that.) and find it helpful at the beginning of a project to define the objectives then periodically check back and make sure the track I'm on still matches my objectives. The project managers out there know this as defining the scope so that definition can then be used to prevent, or at least manage, scope creep as the project progresses.

But since, in my experience, project managers are always the first to go during budget cuts and it would be humiliating to be escorted out the door of my own shop by HR, I just call this step my reality check.

Recap and review so far:

OK, so back to the beginning: the drivers for a Ford pickup based slide-in camper solution if I ever have to replace the van are:

The affordability of pickups:

Affordability is relative. Compared to the cost of a small car pickups might seem expensive, but then again they can perform functions a car, small or large, can’t. And if I need to push it farther, there are plenty of lightly used pickups out there to choose from.

To take the affordability aspect even farther it would be nice if the camper could be sized for the affordable F150 platform, which might be a tall order. According to Ford spec’s the supercab (More on that later.) with 8’ bed (Pretty much a given that I’m going to want a real pickup bed to work with and not one of the stylized ‘short’ beds that might look cool, right up until you try carrying a real load in it.) has a payload of around 1900 lbs. Conservatively speaking, allowing for me, a full tank of gas and a full load of supplies, that leaves about 1100 lbs for the camper.

It’s too soon yet to tell if I’m going to be able to do that. But the good news is that the F250 uses the same bed as the F150 and the 250 supercab has a payload of around 3500 lbs. The bad news is the F250 is more expensive and has a big honking 6.7L engine in it where I can get a 5.0 in the 150.

The common availability of pickups and access to service:

I don’t think anyone can argue that pickups are readily available, in fact around here, out in the country as we are, it’s difficult to buy anything off the Ford lot that isn’t a pickup! Which also means there’s lots of them that need to be worked on so, combine all those trained and experienced mechanics with the plethora of Ford dealerships dotted around the country and ready serviceability is a given.

The ability to move the camper from pickup to pickup:

There might be slight variations in pickup bed dimensions, but in the Fords, over the past fourteen years we’re talking tenths of inches. As long as I don’t try to get too fancy or model-specific with the dimensions of the slide-in shell, in other words, as long as I keep it generic, it should be no problem to move it from one pickup to another.

The ability to utilize the pickup as independent transportation when on the road:

As mentioned earlier, I have owned a few slide-ins in my day and know from experience they aren’t always easy to get on and off the truck, which raises questions about the realities of the ‘drop and go’ aspect of the slide-in. But by leaving sufficient clearances between the slide-in shell and the pickup bed I should be able to ease the hassle of lining the truck up and backing it under the camper.

That still leaves the issue of jacks and tie-downs. I’ll get into more detail later but for now I’m looking at the Stable Lift system to simplify this part of the process.

The ability to utilize the pickup as a pickup when not on the road:

With the van I can always hook up the cargo trailer when I need to haul something large, but that’s the point; I always have to hook up the trailer to haul anything large.

If I had a pickup available I could leave the trailer home quite often and avoid the extra hassle and expense of dragging it along.

The ability to end up with a camper that fits me and my on-the-road lifestyle:

Building something from scratch can be daunting but I've got plenty of experience at it. I don't know how much help I was, but at the age of 10 I helped Dad build a garage on our brand new house, along the way learning how to cut a straight line with a handsaw and properly drive a framing nail home with a tap and three blows. I've been designing and building things ever since, everything from backyard birdhouses to 10 million dollar data centers.

With my experience on the road and camping I've got a pretty good idea what works for me and what doesn't, at least at this point in my life. By staying focused I'm confident I can design a camper tailor made for me and then, if need be, build it.

Next stop: Dimensions


The evolution of a non-expert


I spent a good part of my professional career cleaning up after so-called 'experts' and quickly learned to take what they had to say with a great deal of skepticism.

Me, I'm not an expert, at anything. Never have been and don't plan on starting now. What I am is someone that understands that learning is an ongoing process and you're never knowledgeable enough to justify stopping that process. In fact, halting the learning process is, in my opinion, an indicator of just how much a person doesn't know and understand.

So I think of myself as an evolving non-expert.

Which is why, after decades of hiking and taking care of myself on, - well I don't know how many solo miles of trail, I just made one addition and one change to my hiking gear the other day.

It started while I was looking to replace some of the para-cord that I carry in my backpack.

Over time little bits of it had been used here, and a couple feet over there, and even more to replace some bootlaces, (Para cord makes great, long-lasting boot laces!) until I was far short of what I consider enough to have along, which is at least 50' and I usually like to have more than that.

That might sound like a lot, but when I pick a random spot and practice-build a shelter with my poncho and para-cord I find that 50' goes fast. (I'm not the only one that does that am I?? Practice building emergency shelters????)

What I stumbled on during my quest into the dangerous wilds of the department store aisles, dodging large ladies crash-piloting lethal carts, confused old men wandering aimlessly and unpredictably into my path and, the worst of them all, the recently freed little humans between the age of 'I just learned to run and I don't care if I'm endangering your eardrums with my unchecked shrieks' and 'I'm under 25 with the latest smartphone and attitude', was flat braided shoelace that was labeled as para cord but had no specifications on the packaging.

This is very dangerous in my opinion because, though there are several classifications of para cord, all with varying specifications, common usage of the term has focused on type 3, nicknamed 550 cord, so when most people say para-cord that's the one they think they're talking about/buying/using.


550 Para-cord

In fact I bought some of that generic and under-labeled product just to show the latest, potentially dangerous, scam being perpetrated on the unsuspecting. (Plus I can use it around the shop. It should be great for wrapping around oddly shaped pieces to clamp them while the glue dries.)
Not 550 para-cord


 The product in the left-hand photo was clearly labeled as 550 para-cord with further clarification of it's minimum strength in the small print. As you can see it has a tightly woven nylon sheath wrapped around several nylon yarns. This particular cord, which is the most common and is what most people think of as para-cord, is a utility version of mil-spec type 3. It has 7 yarns, each made of two twisted fibers and is rated, you guessed it, for 550 lbs. A true mil-spec equivalent would be labeled as type 3, not 550, and  have 7 to 9 yarns made up of three twisted fibers, but is still rated at 550 lbs.

It can be used as is but can also be deconstructed to provide small, supple strings that can be used for things like fishing line, small snares, small bindings, and whatever else your imagination can come up with.

The product in the right photo, which was labeled as para-cord but not marked with any other specifications might be either type 1A or type 2A para-cord which have no inner yarns and a 100 lbs. or 225 lbs. breaking strength, respectively, but without proper labeling this stuff is actually nothing but tubular webbing. I have no idea how far to trust it so won't, but some out there might figure para-cord is para-cord and that could be a problem for them.

Anyway, once again I digress.

To get back to the original intended content of this post, finding that cord masquerading as para-cord got me to thinking about the other stuff I carry in my pack and that got me to 'what-if'ing'.

I had everything from my pack laid out on the bench in front of me and I started imagining various scenarios where I might need to use the stuff.

In one scenario I realized that if I were to get myself stuck out there somewhere, and if it was longer than a few days, and if I managed to forage some eatables, I was limited to processing them dry on the end of stick or a slab of bark since I had no container with me that could withstand heating liquids over a fire. (Now admittedly, I have spent a whole lot of time in some pretty remote places and nothing like this has ever happened to me before, but chanting 'this has never happened before' is actually a pretty piss poor survival strategy. . .)


My solution was to add this to my pack.

I could have gone with a high end titanium version, but this anodized aluminum version still weighs less than a pack of gum and costs a lot less. The insignificant weight thing is also why I decided to go for the 20 oz version rather than the slightly lighter 12 oz.

The sales pitch says that the folding handles stay comfortably cool while the rest of the cup is heated and, after testing that statement by heating the cup with a torch while holding it by the handles, I'd say they're right, but I would still probably wrap my hand in a sock before lifting it out of a fire.


I tried to find one of these cups that was more in tune with the .785 liter water bottle I carry as my backup supply in case I drain the 3 liter bladder, but found that they were all designed to fit the typical 32 oz Nalgene bottle or equivalent. For now the setup you see in the photo fits in my pack just fine but I just might have to pick up one of the Nalgene bottles. The wide-mouth version since it could prove to be more versatile than the narrow-mouth versions.


So that was the addition to my pack.

The change I made came about because I finally took a rational rather than emotional look at the knife I have been carrying.


I spent a good part of my career as, what I called, a screw-driver twirler, with my head buried inside main-frame computers and their largely electro-mechanical peripherals. Even as I moved on to management positions I still maintained my roots and always carried a multi-tool on my belt and wasn't shy about using it for simple fixes, specifically I carried the Leatherman Wave pictured above along with it's original and still functioning case.

In fact it was so much a part of me that when I retired, instead of a watch (Which I never wore anyway because I started my career working on vacuum tube equipment which has several hundreds of volts of electricity running around it it just looking for a watch or ring to grab onto. Rather than bother with constantly removing and then re-donning this sort of thing I just never wore it in the first place and that became habit. In fact to this day my wedding ring is a gold hoop in my ear.) they gave me a specially engraved multi-tool.

But rationally speaking, just how many screws am I going to have to unscrew out in the wilderness?? Nuts to tighten with the pliers? Or paper dolls to cut out with those tiny little scissors? And just where am I going to find a can of beans out there to open with my dandy little can-opener?? And how important will it be that I can file my toenails?

Of course that still leaves the knife blade and that tiny little saw, But the hard truth is that when one thing tries to be many it's a compromise for all. In reality that blade, more specifically it's mounting, is pretty weak and won't stand up to a lot of twisting or batoning (Pounding on the back of the blade with something to drive it deeper.) and the saw is far too short to be useful. Anything small enough to cut with it is small enough to just break in the first place.

So, with some regret and proper ceremony, I retired my multitool to a spot alongside the photo of my father over the workbench and replaced it with a proper wilderness knife.


There are more expensive, hand made knives I could have gone for, but in my personal reality, I'm not going to stress my knife to the max with near constant and abusive use, so I chose this more affordable yet adequate one; despite it's flamboyant branding. (I tried to find the same knife without the branding but couldn't.)

It has a full tang for maximum batoning strength as well as a very sturdy pommel (The base of the handle.) that isn't going to break when I pommel something. such as when driving sharpened sticks into the ground to act as tent, or rather shelter, stakes.

As a bonus it comes with a ferrocerium stick and a flat-grind on the back of the blade for striking sparks from it.


 And the clincher was this sharpener built right into the sheath. True, you can always get a better edge with proper stones, but this sharpener will always be right there and will create a good-enough edge whenever needed.


The down-side is the size of my new knife. You see, though the knife will be stored in my pack between hikes, it will be carried on my person during hikes.  That way if I ever get separated from my pack I won't be completely naked out there. (For instance when fording water I always undo the waist and sternum belts and carry the pack loosely on my shoulders in case I go down and need to shed the weight to keep from drowning.) I always carried the Leatherman in one of my leg pockets. I've done some experimenting and the new knife fits, barely, into the same pocket but only time and some miles will tell if that's a workable solution.


So there you have it, one more step in the evolutionarily growth of a non-expert.

Oh, and by the way, sometimes I feel a little ridiculous carrying my well-stocked pack on short, easy hikes, but the other day I was watching a travel show and saw the host, in jeans and T-shirt, being escorted by a ranger up a trail to a cave. The trail was a bit of a scramble but the cave was actually within sight of the trail-head, yet the ranger, a professional outdoorsman, was wearing a well stocked pack non-the-less