OK, It's been a while since the last What If post but that's because I've either been busy with other things around here or camping, but I'm back! At least for the moment.
Electricians are sometimes the last
sub called into a construction site. This is because placement of their
equipment and wires is much more flexible than that of plumbers or the HVAC
people. But that doesn’t mean electrical systems can be thrown in wherever
without giving it some thought, especially when it comes to a boondocking RV.
Besides limited space and weight distribution issues, the boondocking electrical system requires a bit more thought than a typical house system.
And it all starts with batteries.
Batteries:

You can buy single 200 amp hour
batteries in the 4D case and I’ve used them before, but these things are big
and very heavy! Not that a pair of 100 amp hour batteries are any lighter but
at least with them you only have to wrestle with half of that weight at a time.
Besides, 100 amp hour group 27 batteries are pretty common so are easy to find
just about everywhere, sometimes the 4D's are not quite so easy to find. (And I'm assuming I don't have to point out that whatever the battery you pick it needs to be
deep cycle?? Seriously! Automotive, or starting, batteries will not last
at all in this type of application!!)
Before the days of gel and AGM's, even before the days of maintenance free, I used what these days are called serviceable wet-cells, (Back then they were just called batteries.) and you could argue that in larger sizes they are still more robust today than the maintenance free battery, but there's more to the story than that.
Maintenance free lead-acid batteries are actually nothing more than the old serviceable lead-acids with different kinds of caps on the cells, but those caps have a big advantage. While all wet-cell lead-acid batteries can out-gas during charging, the maintenance free caps pretty much keep all the gasses inside, (As long as there's no serious overcharging involved.) which eliminates the need to frequently check the electrolyte level in each cell. And let's be real here, given the out-of-sight-out-of-mind nature of RV battery placement and our natural inclination to laziness, serviceable batteries usually don't get checked as often as they should and tend to die an early death.
As an alternative to wet-cells of either ilk I've used AGM batteries in the past. AGM's have the electrolyte encapsulated in a gel matrix so it can’t spill or slop. In fact you can even mount these batteries on their sides if they fit in the compartment better that way. And they are robust enough to stand up to the abuse of a jet fighter, which is the environment they were originally designed for.
But as you would expect, this type of technology is expensive, about twice the cost of a traditional wet-cell battery. To offset some of that cost AGM's are reputed to last longer than their less expensive brethren, but that hasn't been my experience with them. So for now I'm back to the more traditional batteries, the maintenance free version anyway.
 |
| X-ray view of battery and tank placement at the front of the camper floor with space between for chair |
Also, (As long as I'm on a regardless kick here.) regardless of the type of battery installed, serviceable, sealed, gel or AGM, RVIA requires that the batteries be encased in a
gas-tight container that is vented to the outside if they are located inside the living compartment, and for good reason since all these batteries, regardless of type, (Snuck another one in!) can still be forced to out-gas if abused.


Ready made or home built, it’s important to place the vent for the battery box as high as possible, or better yet, have one high and one low. Here I’ve installed a 2” vent at the very top of the box near the front and another one at the bottom rear. Both of these vent through the side of the shell and into the pickup bed area.
If it happens (And you hope it doesn’t because it pretty much kills a sealed battery!) during an out-gas event the hydrogen gas escapes the battery, is contained in the sealed battery box while it vents into the pickup bed. Once there the lighter than air gas will quickly disperse into concentrations too low to support ignition and dissipate through the gap between the shell bed wings and the top of the pickup bed sides. a result much more desirable than having it hang around and blow something up! (I still remember the pale orange flash and squeaky pop when lighting hydrogen trapped in an upside-down beaker in chemistry class. Not a sound I want to hear while sleeping with my head a few inches from the batteries!!)
Shore-power charging:
If I want to use shore power to top
up my batteries I need a charger, and it's important that this be a good, multistage charger, not the little red beast with alligator clamps I keep in the garage. That thing is not at all gentle with expensive batteries and could potentially create that out-gassing scenario mentioned above, whereas a good multistage charger will baby the batteries and contribute to their extended life.
Conventional wisdom in the battery world is to use a charger no larger than 25% of the battery capacity for the best combination of rapid charging and overall battery life. In other words, for 200 amp hours of battery no more than a 50amp charger should be used.
I know this is America where we have a tendency to think bigger-is-better and 40 - 50 amp chargers are often found as standard equipment in our RV's, but I personally think there's a flaw in this logic.
Using a big honking charger capable of stuffing batteries full to the brim in the least amount of time possible, (Short of actually damaging the batteries which is what happens if you use a charger too big for the battery capacity.) might make sense in some situations, such as in-store shopping scooters and rental golf carts which need to be recharged as quickly as possible, but when I plug my rig into shore power it's usually for a fairly long period and there's really no need for the rush. Even if it's only an overnight stop I'll still be plugged in for around 12 hours or so.
So, as I see it, in an RV there's really very little incentive to go for the big charger and several reasons for using a small one.
Using Xantrex Truecharge2 line of chargers as an example, some of these reasons are illustrated in the chart below:
40 amp charger 10 amp charger
Size 14 x 18 x 12 6 x 9 x 5
Weight 6.5 lbs. 3.5 lbs.
Cost $320 $145
In addition, the small charger uses a lot less of my shore-power amps, leaving more for other things, such as running the dreaded AC, which lately has been my only motivation for even bothering with shore-power in the first place.
So, as far as I'm concerned, the small charger it is.
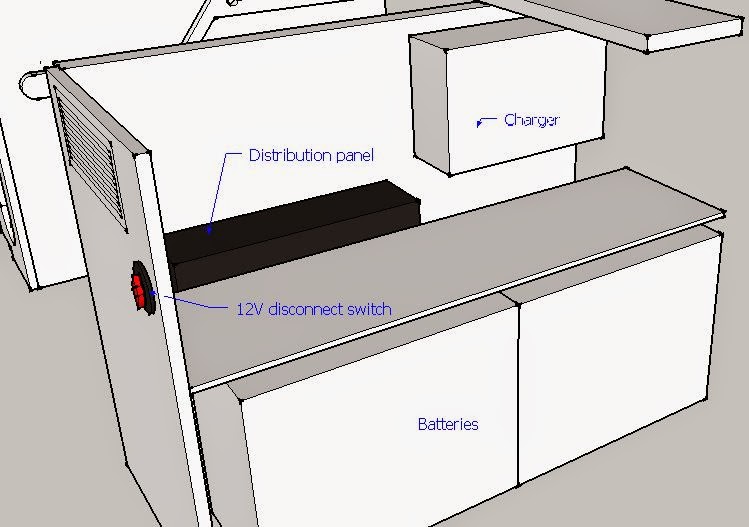
There’s plenty of room for a charger in the enclosed space under the bed right there next to the sealed battery box, along with the combination 12V/120V distribution panel and a battery disconnect switch with room left over for running the wiring.
Generous ventilation in this area helps keep things cool. (I had to add additional ventilation for the charger in one of my previous rigs to keep it from tripping out on over-heat.)
 Shore power is brought into the
camper through a marine style 30 amp inlet. These are slightly more expensive than the
stab and twist style inlet usually used on RV’s but is more secure and water resistant,
especially if used with a corresponding marine style shore power cord which has a screw-down weather seal.
Shore power is brought into the
camper through a marine style 30 amp inlet. These are slightly more expensive than the
stab and twist style inlet usually used on RV’s but is more secure and water resistant,
especially if used with a corresponding marine style shore power cord which has a screw-down weather seal.
The inlet will be placed in the underside of the bed-rail wing of the camper shell below the gravity tank fill. Here it will clear the side of the pickup bed on the outside and on the inside is located in the cupboard under the left-hand counter, forward of the grey-water tank.
One final comment before leaving the shore-power charger: In my current rig I have an expensive charger/inverter installed, which out of necessity has to be a large 40 amp unit, but have decided after years of real-world use, that the inverter part is just not doing that much for me, (In fact the inverter part hasn't worked for several months now and I'm not really motivated to fix it.) so that option has been removed from the table.
Conventional wisdom in the battery world is to use a charger no larger than 25% of the battery capacity for the best combination of rapid charging and overall battery life. In other words, for 200 amp hours of battery no more than a 50amp charger should be used.
I know this is America where we have a tendency to think bigger-is-better and 40 - 50 amp chargers are often found as standard equipment in our RV's, but I personally think there's a flaw in this logic.
Using a big honking charger capable of stuffing batteries full to the brim in the least amount of time possible, (Short of actually damaging the batteries which is what happens if you use a charger too big for the battery capacity.) might make sense in some situations, such as in-store shopping scooters and rental golf carts which need to be recharged as quickly as possible, but when I plug my rig into shore power it's usually for a fairly long period and there's really no need for the rush. Even if it's only an overnight stop I'll still be plugged in for around 12 hours or so.
So, as I see it, in an RV there's really very little incentive to go for the big charger and several reasons for using a small one.
Using Xantrex Truecharge2 line of chargers as an example, some of these reasons are illustrated in the chart below:
40 amp charger 10 amp charger
Size 14 x 18 x 12 6 x 9 x 5
Weight 6.5 lbs. 3.5 lbs.
Cost $320 $145
In addition, the small charger uses a lot less of my shore-power amps, leaving more for other things, such as running the dreaded AC, which lately has been my only motivation for even bothering with shore-power in the first place.
So, as far as I'm concerned, the small charger it is.
There’s plenty of room for a charger in the enclosed space under the bed right there next to the sealed battery box, along with the combination 12V/120V distribution panel and a battery disconnect switch with room left over for running the wiring.
Generous ventilation in this area helps keep things cool. (I had to add additional ventilation for the charger in one of my previous rigs to keep it from tripping out on over-heat.)
The inlet will be placed in the underside of the bed-rail wing of the camper shell below the gravity tank fill. Here it will clear the side of the pickup bed on the outside and on the inside is located in the cupboard under the left-hand counter, forward of the grey-water tank.
By placing the inlet here, not only is it protected from most weather, it's also out of sight.
One final comment before leaving the shore-power charger: In my current rig I have an expensive charger/inverter installed, which out of necessity has to be a large 40 amp unit, but have decided after years of real-world use, that the inverter part is just not doing that much for me, (In fact the inverter part hasn't worked for several months now and I'm not really motivated to fix it.) so that option has been removed from the table.
Solar charging:
In reality, for my type of camping, I could leave off the shore-power charger altogether and only miss it occasionally, but living without a good solar system would be - well - let's just say it would be like living in a well known place that's just as as hot as the Sun!
The logical place to start the solar system is with the panels themselves.
The logical place to start the solar system is with the panels themselves.

With the costs dropping rapidly the more relevant question is, how much roof is there?? For a system designed to the demands of frequent boondocking I'm going to run out of roof before I get any where near having too much panel!
The technology is changing just as fast as the prices are dropping, but, based on today's offerings, something like the
PowerFLEX PFM-2K system is attractive. This includes two flexible panels about 82” X 22” that
mount to the roof with adhesive that give me the 180+ watts I consider the minimum required,
no additional holes in the roof for mounting them and the lightweight panels sit right down tight to the roof
where they create virtually no additional air drag when traveling down the highway.
As you can see from the image above, there's still some left over roof space that could be utilized and any final decision on exact panels would only be made near the time of purchase in order to take advantage of the latest offerings.
As you can see from the image above, there's still some left over roof space that could be utilized and any final decision on exact panels would only be made near the time of purchase in order to take advantage of the latest offerings.
 |
| The dark rectangle is a solar charge controller, the dark circle above it, an E-meter, the red switch is for disconnecting the solar panels from the system, and the two 12V receptacles are for the discrete charging of various devices. |
Additional bits:
Also, no self-respecting off-grid
system can be properly managed without some sort of E-meter that tells you all sorts of
things you need to know about your battery and power consumption. I’ve mounted mine just above the solar
charge controller.
I chose this spot to cluster these devices together because - well - they go together, and any little
lights that glow continuously on any of these devices are tucked in a cupboard
and shielded from the bed area.
In order to accommodate the depth of these devices the partition in the cupboard has been expanded into a shallow box to protect the backside of the devices and hide the necessary wiring.
In order to accommodate the depth of these devices the partition in the cupboard has been expanded into a shallow box to protect the backside of the devices and hide the necessary wiring.
This little box is also a good place
to mount some outlets.
I’ve mounted one each 12V and 120V
outlet into the bottom of this box for use at the counter. In addition I mounted
two more 12V outlets inside the cupboard to be used for
charging various batteries and devices such as phones.
A final device located up here is a high-amp
12V disconnect switch. I use it for
disconnecting the solar panels from the charge controller and hence the rest of
the 12V system. I don’t usually see these in RV solar systems but feel that it is essential.
I already mentioned a few of the 12V and 120V outlets that will be installed. Elsewhere, I have placed additional
outlets of both kinds in strategic spots for powering the fridge, air
conditioner, electric space heater, and devices at both countertops and near
the chair.
In addition 12V power will be routed
to things like the water pump, power vent and lighting.
There will be three primary types of
lighting. Area lights in the ceiling for overall illumination, under cabinet lighting to
illuminate the countertops, and task lighting, primarily for reading. All
lights will be LED to keep consumption to a minimum.
In order to avoid compromising the
limited structure of the camper-shell walls, the majority of the wiring is designed to be surface mounted, mostly
up inside cabinets where it's out of sight. The major exception is the 12V lines to the power
vent and the area lighting in the ceiling, which will have to be run inside the ceiling structure to keep it out of sight.
One final little piece of the electrical system will be some connection between the engine alternator and the house batteries.
Typically this involves a battery isolator to make and break the connection automatically, thus protecting the chassis battery from the loads imposed on the house batteries. I've become a bit disenchanted with this type of setup which eliminates any sort of manual control, and options, from the equation while adding a bit of complication and cost. Oh sure, it's nice and convenient when everything works as it should and does what I want when I want, but experience shows that's not always going to be the case. Instead I'm leaning towards a manual system (i.e. a big honking switch!) that I can use when and how I need to and if I miss-use it that's on me.
OK, so far I've covered the majority of the camper's systems and will see what I can do about wrapping up the remainder in the next post.
No comments:
Post a Comment