I’m starting the 'systems I will have' with the plumbing
because, even in a small space such as this, it’s actually the more complicated of the systems in terms of fitting
it into the space and having it function, so, just like in new-home
construction, it's the first system that needs to be laid out in detail.
Tanks:

When I first started building
campers I installed the largest tanks I could fit. In one of my rigs this
resulted in a 40 gallon potable tank.
At the rate I go through water that would last me over a month! Sounds good but wait! When full that’s 336 lbs. of water!! That would be like carrying Fat Jack and his cousin around with me, and I certainly don’t want to be stuck out there on the road with Fat Jack and his cousin! In fact once I realized my mistake I never did fill that tank any more than about a third full.
At the rate I go through water that would last me over a month! Sounds good but wait! When full that’s 336 lbs. of water!! That would be like carrying Fat Jack and his cousin around with me, and I certainly don’t want to be stuck out there on the road with Fat Jack and his cousin! In fact once I realized my mistake I never did fill that tank any more than about a third full.
For the last 8 years or so I have
been traveling with a set of 10 gallon tanks, matched potable and grey-water, which lasts me over a week. (I know,
sounds hard to believe but these numbers come from extensive field testing.)
This means I’m only carrying 84 lbs. of water yet still have plenty for my
needs.
So 10 gallons it is, two off the
shelf tanks. One for potable water and one for grey water.
When determining tank placement
there are a few things I keep in mind. In order to keep the weight distribution
fairly constant as I move water from one tank to the other, I like to keep the
two tanks close together. I also like to
keep 100% of the plumbing, including the grey water tank and all dump valves,
inside the insulated envelop of the RV so camping in the occasional
below-freezing weather isn’t so complicated. Ideally I can easily see the tanks
so I don’t have to rely on finicky and inaccurate level monitors. The tanks
need to be down low for a better center of gravity. And if possible I should be
able to gravity-drain both tanks.
With small pickup campers there are
limited options for the placement of the tanks and I didn’t manage to hit
everything on my list with this one. For instance, the potable water tank is down low up under
the bed, but the grey water tank would only fit in that space if I gave up the
chair, and the chair won.
The potable tank:
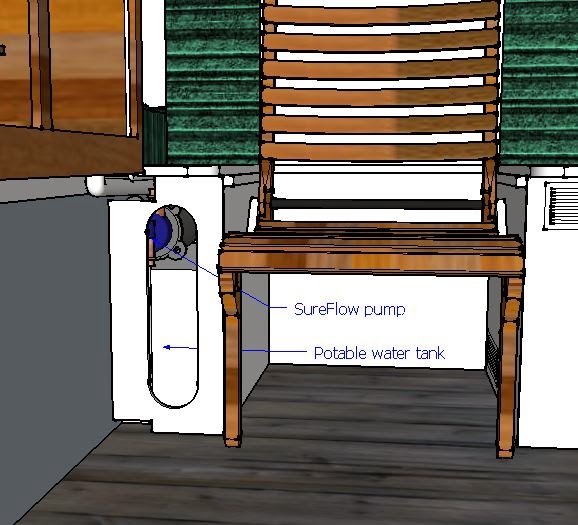
The ten gallon potable tank is
tucked up tight against the left side of the camper floor area under the bed.
There’s enough room in the space above the tank and below the bed for the
SureFlow demand pump that will get water out of the tank and up to the sink.
These pumps have the ability to dry-pump water a vertical 6’ so having the pump
above the tank like this will be no problem and also means the plumbing can be
disconnected from the pump without having to drain the tank first.

The output of the pump is plumbed up through the cabinet and over to a single-handle faucet at the sink.
A lighted switch for 12V pump power, not shown in the drawing,
is located in the face-frame of the cabinet just under the counter overhang.
Here it’s protected from accidental bumping but if left on, which I don’t like
to do when not using water, the red light in the switch can easily be seen from
the chair, bed or the rear door.
I thought about plumbing the line from tank to pump with a T and valve so that if the tank does need to be drained I could do it via gravity by hooking up a hose to the output of the valve and running it out the rear door. After looking at this for a bit I decided that was a complication and potential failure point I didn’t need. Instead draining the tank through the sink with the pump will suffice on those rare occasions it needs to be done.
Filling the tank is slightly
trickier than getting water out of it.
Since I never hook up to city water
I chose to go with a gravity-fill port.

This is the kind of fill where you
open a key-locked door, (Important for protecting your water source.) remove the
cap you find behind the door and pour water down the pipe.
Unlike a city water hookup which only works with a hose and pressurized water, with a gravity fill you can use a hose to do the pouring, a bucket, a water can, a Slurpee cup, or pretty much anything that is reasonably clean and doesn’t leak too much.
Unlike a city water hookup which only works with a hose and pressurized water, with a gravity fill you can use a hose to do the pouring, a bucket, a water can, a Slurpee cup, or pretty much anything that is reasonably clean and doesn’t leak too much.

A 1” or so tube runs downhill from the fill to the tank and a smaller tube (Not drawn in here.) runs back up the same path from the tank to the fill port and acts as a vent. Very simple, very versatile, except you must be careful and insure that the fill tube is installed so that it is running continuously downhill from fill port to tank top.
My first thought was to put the fill
port as high up under the counter as I could. This gives the greatest amount of
drop between the port and tank, but also puts the fill port up somewhere around
5’4” above the ground when the camper is on the truck, which is a little high,
especially for the vertically challenged.
By lowering the port 6 inches I got
the height down to around 4’10”. Still not great, especially if trying to hoist
a full 5 gallon jerry can and hold it up to the port, (So don’t do that!! A
pair of easily stored, collapsible 2 gallon cans keeps you balanced while
carrying them from the water source and each can is light enough that it’s not
going to wreck you lifting it to the fill port.) but at least the port is at or
slightly below eye level for the average person.
This position still allows the fill
tube to run downhill at a decent angle from the fill port to the front edge of
the cabinet. From there the fill tube threads down through the cabinet overhang
(Which is one reason it’s there in the first place.) and then back to the tank.
By necessity, this portion of the tube is at a much shallower angle, (It's got to clear the pump.) but the
pressure from water falling down the steeper part of the tube will help push it
quickly through the shallower portion.
By having the fill tube enter the
tank approximately midway between the front and back, water being forced back
up the tube due to sloshing back and forth during acceleration and braking is
minimized.
In comparison, the small vent tube
running from tank to fill port is much less finicky and I haven’t bothered to
draw it in as it will simply follow the path of the larger fill tube.

To keep it secure the tank is enclosed behind a couple panels that can be removed for access by unscrewing them. An oblong view-port is cut into the end panel so the tank behind it can be easily seen. Being translucent the level of water in the tank is readily visible this way and there's no need to rely on finicky level sensors or just plain ol' dumb luck.
The section of bed platform over the
tank area is hinged for quick access to the pump without having to unscrew anything.
The grey water tank:
I couldn’t use the best spot for the
grey water tank in terms of weight distribution, down there under the bed beside
the potable tank, because the chair is in the way, so I used the second best
spot, directly under the sink.

The downside of this spot is that the weight distribution is not ideal. As water is moved from the potable tank to the grey water tank the weight moves up, to the side, and to the rear. Fortunately the grey water tank is over the axle and not behind it which could adversely affect the overall center of gravity.
Another disadvantage is that it takes up quite a bit of the cupboard space there under the sink.
The upside of this location is it’s
right there below the sink and against the upper sidewall of the camper shell
which greatly simplifies the plumbing and operation of the tank.
Like filling the potable tank, getting
water from the sink down to the grey water tank is also a downhill battle, but
with this location it’s a very short battle, though one that only works by
eliminating the traditional P trap under the sink.
In order to prevent odors from
wafting up the drain line and out the sink the usual solution in this country is
to use a P-trap. A P-trap works by retaining a bit of water in the bottom of it
that prevents gasses from backing up into the sink.
There are a few issues with this. A
P-trap takes up a fair amount of space under the sink that I don’t have, and it
would hang lower than the top of the tank which means the drain won’t work very
well as the tank fills. In addition the water trapped in the bottom of the P to
prevent stinky gases escaping is now a potential source of damage if
temperatures get below freezing while the camper is stored.
 |
| The tall piece in the center of the photo on the left of this image is a waterless trap |
European’s have been using waterless
traps for decades and these have recently begun to make their way across here to the USA. A waterless trap, as the name implies, has no water in it to freeze
yet still seals out gasses from the tank, but the main thing about them is that
they are no larger than a piece of the drain line with a slight bulge in it.
Since these waterless traps function
just fine at a 3 degree angle, they can be installed nearly horizontal, just
below the sink drain with a special 87 degree elbow you can buy with the trap and
the whole thing needs far less space than a traditional P-trap.
As with the potable water tank, the
drain line enters the grey water tank from the top near the fore and aft center of the tank to minimize
the possibility of spurting water the wrong way up the drain line due to
sloshing.
Despite the self venting claims for the waterless trap, for my peace of mind, regardless of the type of trap used,
the drain line, and through it the tank, still needs to be vented to the
atmosphere.
The traditional way of doing this
would be to run an extension of the drain pipe up through the roof. I could do
this relatively unobtrusively by routing the vent to the rear edge of the cupboard then up through the roof, but the vent pipe would be visible between the counter and the upper cabinets. Besides, I’d rather keep holes in the roof
to a minimum.
An alternative is to route the vent
pipe as high up under the counter as possible and straight out through the side
of the camper shell. That works too but,
in addition to leaving a visible vent opening in the side of the camper, one
that is awful close to an opening window, experience has taught me that the vent
cover over that opening will stain and the seal will crack over time. If not
taken care of regularly water will start to work its way into the wall
structure.
 So I used what amounts to an
elongated, upside down P-trap mounted as high up under the counter as possible
then run to the rear of the cupboard and straight down and out through the bed-rail wing of the camper shell
just far enough inboard to clear the camper-jack mounting plate.
So I used what amounts to an
elongated, upside down P-trap mounted as high up under the counter as possible
then run to the rear of the cupboard and straight down and out through the bed-rail wing of the camper shell
just far enough inboard to clear the camper-jack mounting plate.This position protects the vent cover from most weather and all direct exposure to the sun, (Assuming I always keep the greasy side down!!) as well as keeps it out of sight. And finally, if the seal on this vent cover does fail, its location and gravity will tend to minimize any water ingress.
Technically, with a single fixture
to vent like this, I could reduce the vent piping by one pipe size below that
of the wet part of the drain line. So, with a 1 ¼” wet drain I could use a 1”
vent. I’ve got it drawn as a 1 ¼” vent
for now. We’ll see if that needs to be changed for any reason.
Unlike the potable tank, the grey
water tank gets drained frequently. If the tank was down on the floor next to
the potable tank, in order to drain it I would have to use a second SureFlo
demand pump to get the water up and over the side of the pickup bed. But with
the tank sitting up there on the bed-rail wing of the camper shell like this
gravity draining turns out to be pretty easy because all I need is a few inches
of piping and a valve.
One seemingly elegant option is to
have the drain fitting in the bottom of the tank and dropping right out through
the camper shell below it. This puts the drain fitting in the lowest part of
the tank, eliminates any additional plumbing inside and means the drain line only
needs to be a couple inches long.
The downside of this is that the
valve would have to be outside the camper shell in behind the jack system. I
don’t mind the in behind the jack system part, it’s the hanging outside part
that bothers me, because now a relatively delicate part of the system,
the valve, along with a little bit of piping, is unprotected from freezing
weather.

So I went another way. I put the drain fitting in the bottom-middle of the rear wall of the tank. A quick 90 elbow leads to a ball valve (Not drawn in.) and another 90 elbow down through the bottom of the bed-rail wing leads to a standard hose fitting on the outside. To drain the tank, one end of a hose is screwed to the exposed fitting, the other end is placed in any available drain or container, and the valve inside the cupboard is opened.
In the time it takes to fill the
potable tank the grey water tank will be empty. And once the valve is closed
that little bit of pipe sticking out of the camper shell will have no water in
it to freeze.
Of course I’ll have to come up with
some way of protecting the pipe and valve inside the cupboard from getting
knocked around by a stray can of beans or wandering pot but that shouldn’t be
too difficult.

This tank drain setup is one reason why I carried the vent pipe as far aft in the cupboard as I could though the primary reason was to get the vent opening as far from the opening window as possible.

And finally, in order to recover some of the
storage space lost by stuffing a tank in the cupboard under the sink I added a shelf that sits on top of the tank. This shelf will sit on
cleats and be removable if I need to do any maintenance on the tank or
plumbing and it gives me space for storing items up to 6 or 7 inches tall.
No comments:
Post a Comment